B737-300 Throttle Quadrant & Center Pedestal - Arrived at Last

A big orange truck from TNT Express parked outside the house this afternoon and the driver began to offload a large wooden crate that weighed around 80 kilograms.  I could be only one thing – the Boeing throttle quadrant and avionics box (center pedistal) had finally arrived.   

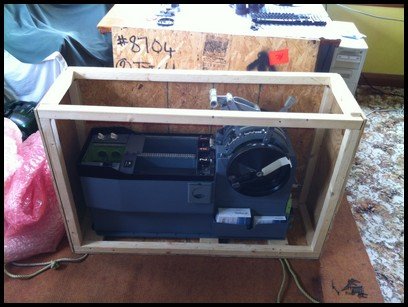
Together, the driver and I manhandled the crate through the hallway of the house to the room in which construction of the simulator is taking place.  Removing a heavy piece of machinery from a wooden crate can be tricky, and the only method was to disassemble the box screw by screw – WOW what beauty!

Initial Thoughts

The throttle and avionics bay is a genuine aircraft part so there wasn’t much to not like; you can’t “immerse” yourself or get a more authentic experience than by using a real aircraft part.  The throttle originally was in use in a Boeing 737-300 with South West livery.  Unfortunately, the guy at the tear down yard didn’t document the tail number of the aircraft it was removed from.  It would have been nice to have a photo of the actual aircraft to place on the Blog.

The first aspect I noticed about the throttle was the build.  It’s a solid piece of engineering built to withstand the neglect of pilot use and now simulator use.  I don’t believe the throttle will ever be damaged from neglect my end – its’ solidly constructed.  The feel when you push the two power levers forward is - well – you just have to be here!  Manoeuvring the flap lever through the various indents is equally rewarding.  Knowing that the throttle was once used in a real aircraft by real pilots adds a completely new dimension to flight simulation.
Retrofitting and Connectivity

During the refurbishment of the throttle, I had decided to not bastardize the throttle to try and replicate the appearance a throttle from a Boeing NG.  Therefore, the throttle remains a 300 series throttle.  It has been repainted only where necessary and decals have been replaced only when they were unreadable.  The internal mechanism of the throttle has been completely striped, cleaned and serviced.  Parts, such as the huge cog wheels and unnecessary internal wiring have been discarded as these are not required for simulation use. 

To allow the throttle to connect correctly with flight simulator, three Phidget cards (0066 & 0064) & a Leo Bodnar card (BUO 836X) have been used.  The cards are connected directly to the front of the throttle casing and will not be visible once the throttle casing is connected to the centre stage of the main instrument panel (MIP). 

All the functions of the throttle operate with the exception of the stab trim switches, which can be linked to another FS function if required.  Trim wheels are functional with the use of a servo motor and the trim spins when electric trim is activated on the yoke.  Back lighting is integrated back lighting (IBL) using genuine Boeing 5 volt bulbs.

oem 737-300 throttle quadrant - initial thoughts: it’s built like a thunderbox

Current Status

At the moment I’ve only taken delivery and am in the process of connecting a Benchmark card to an external power source to allow power to reach the 5 volt lighting bulbs and servo motors.  I have little doubt that there will be teething issues with software as I configure everything for correct functionality, but I believe that this extra effort is worthwhile to be able to use a real throttle instead of a replica.

Center Pedestal

The avionics bay is a two-bay type.  Two-bay types were mainly used on the earlier Boeing classic series jets up to the 200 series, however, a number of 300 series aircraft used them as well as 400 series.  The bay was attached to the throttle when I bought it, so rather than dump it and replicate a NG three-bay; I’ve decided to use it to maintain authenticity.  I may at some stage in the future replace it with three-bay – I’ll see how things develop once I begin to populate the bay with avionics instruments.  One benefit of using a two-bay style is that once Weber seats are fitted to the flight deck there will be more room to squeeze past to get into the seat!

An interesting feature to the unit is the positioning of two oddly shaped aluminium pull downs.  At first, I had no idea what these were used for.  Then it dawned on me – they are retractable coffee cup holders.  What more can you ask for (laughing). 

oem 737-300 fire suppression panel

Fire Suppression Panel (FSP)

The fire suppression module was an afterthought.  A second hand unit was available and I decided to retrofit this with limited functionality to flight simulator.  At the moment IBL works, and when pulled, each fire handle does what it’s supposed to do.  At some stage in the future I may activate the fire bell.  But, at the moment it’s early days with regard to this.  Basically it’s a module that has to be installed into the avionics bay for aesthetics; a TQ without a fire suppression module looks a slightly naked.

More on the actual avionics bay at a later stage when I begin to populate the bay with instruments - much kmore interesting than looking at "naked bay"

Throttle Quadrant & Center Pedestal on the way (finally)

The QANTAS strike in Australia has sure left me stranded - not personally but with freight.  Even though flight operations were only cancelled for a few days, the backlog of freight and essential cargo that has been delayed is staggering. It just proves that Australia really does need another major airline so that Qantas does not hold the nation to ransom.

Throttle Quadrant and Center Pedestal

After almost a month in transit (who said air freight was fast), the 737 throttle quadrant and center pedestal has arrived in Sydney, only to be sitting on the floor of the Qantas warehouse for a week!  My customs forwarder advised me on Friday that Qantas finally has released the freight for dispatch to Melbourne then onwards further south to Hobart.  Arrival time is mid next week (touch wood).

Main Instrument Panel

The main instrument panel, I have been reliably told by Peter Cos of Flight Deck Solutions, has been wired and will be ready for dispatch later next week.  I'll ensure this freight is NOT sent via QANTAS - maybe DHL.

In the interim, whilst waiting for freight to arrive, I've been kept busy setting up the two computers and learning about networking in Windows 7.  After many hours, it seems that many of these matters are now well on their way to be solved.  I've also been spending considerable time researching the various flight models that can be used with Sim Avionics.

It will soon be time to begin the build phase of the project.

Boeing Style 737 Clock

737 cl clock installed to mip. a future project will be wiring the clock for operation. at the moment 5 volts backlighting is connected

Whilst waiting for the Main Instrument Panel (MIP) to arrive from Flight Deck Solutions (there has been a delay in fabrication), I came across this OEM 737 clock for auction on e-bay.  The clock has been removed from an American Fed Ex aircraft and has been serviced to new condition.  The price I paid was very reasonable and my thoughts were it would make a very nice addition to the MIP to replace the stenciled clock or reproduction clock on the First officer side.

I'd like to try and get the clock working with the simulator, and will look at doing this sometime in the future.  At the moment I will contend with the fact that it's a nice looking 737 style clock that adds to the aesthetics of the MIP on the First Officer side.

OEM components are generally inexpensive and often less than the price of reproduction items, and while conversion of an OEM part can be difficult for the technologically challenged, it is not impossible.

If you are seeking realism, then OEM components provide a more tangible feeling to what is in effect a reproduction flightdeck.

737-800 Clock

This clock is not what most Next Generation aircraft have installed.  The Next Generation usually has a digital chronograph.  I am using a chronograph on the Captain-side. This style of clock is more readily observed in a 737 classic airframe. 

I intend to fit this clock to the First Officer side of the MIP.  The Captain side will have a standard style Next Generation chronograph fitted.

Update

on 2016-03-01 12:58 by FLAPS 2 APPROACH

I've received several e-mails asking where I found this clock and how much I paid for it. 

I discovered the clock on e-bay and the price was a tad over $100.00 USD with freight.  The freight paid was most of this amount!  A fair price, in my opinion, for a serviceable 737 style clock.

Boeing 737 Fire Suppression Panel - Arrived

737-300 Fire Suppression Panel

All excitement here!

A short time ago I received an e-mail from a friend, who has found a 737 Fire Suppression Panel (FSP) in a tear down yard.  A bit of negotiation concerning the purchase price and it's now mine.  

oem 737-300 fire suppression panel

The attached photographs are what the unit currently looks like; a little bashed about with damaged labels and chipped paint.  But, overall it is in good condition.  Once it's cleaned up and refurbished it will look almost like new. and, as I've said in earlier posts, there is nothing better than a real aircraft part.

A decision is yet to be made whether the unit will be converted with full functionality or left as is with only bac lighting connected.

Certainly, a fully functioning fire suppression panel would add benefits when simulating single engine operation and / or an engine fire or overheating situation. A fire can be generated in flight simulator from the instructor console in Sim Avionics. A fire can be generated and then the appropriate fire handle can be pulled to extinguish the fire and stop the engine. 

The FSP is not an item you use regularly, if in fact at all.  However, inclusion is mandatory if you are striving to attain a certain degree of authenticity and realism in your flight simulator.

Update

on 2014-07-24 13:03 by FLAPS 2 APPROACH

The 737-300 fire suppression panel shown here has since been sold and replaced with a 737-600 fire suppression panel.  There are subtle differences between the earlier units and Next Generation panels which I did not know about when I purchased the 737-300 CL unit. For example, the Next Generation unit has additional annunciators (Korrys).

The replacement fire suppression panel, which is in better condition, has been converted and has full functionality.  I will discuss the conversion and use of the Fire Suppression Panel in a future post. 

Boeing Style 737 Toggle Condoms

Occasionally you come across a product which is a good idea, such as these small plastic push on toggles (flight condoms) that can be used to replicate the same style toggle used on the Beoing 737 aircarft.

Although many high-end companies already replicate these Boeing style toggle switches in their ICS overhead panels, there are many flight deck builders who either manufacturer their own panels or use other generic style toggles for various simulation purposes.

For instance, I’m not intending to replicate an overhead panel until near completion of the project.  As such, I’m using a number of standard GoFlight GF T8 switch panels/modules to mimic certain overhead functions.  These little push-ons can change the appearance of a GoFlight module from just a boring toggle to something that actually almost looks like a Boeing toggle switch.

GLB Flight Products produce two similar toggle cap lines.  One is the white toggle cap that pushes over an existing toggle.  The other is a complete sleeve replacement of your current assembly  with a new toggle sleeve and cap.  The new sleeve slides over a small diameter toggle switch and with a dab of super glue will stay there forever.

The sleeve toggles are not inexpensive. 

The toggle condoms and toggle sleeves can be purchased from GLB Flight Products.  I believe a similar product can also be found at Open Cockpit

Please note I have no affiliation with any company.  This journal entry is for information only.  Images are copyright to the respective company.

Which MIP - Half or Full

Several companies fabricate 737 Next generation Main Instrument Panels (MIP) and each company offers different design options.  Basically, you have the following main options - some with and without instrument integration.

  • Full MIP with lower kickstand & CDU bay (Double Seat Training Device (DSTD)

  • Full MIP (desktop version) without lower kickstand & CDU bay

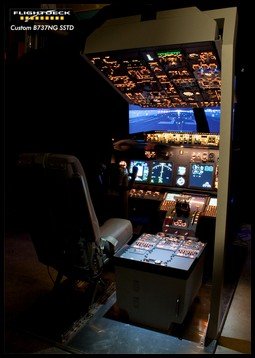
  • Half MIP with lower kickstand & CDU bay (Single Seat Training Device (SSTD)

  • Half MIP (desktop version) without lower kickstand & CDU bay

LEFT: A half MIP (SSTD).  Just because you don't have a DSTD doesn't mean you cannot have realism (photo courtesy FDS).

Which MIP is purchased depends on what level of realism is sought, your budget, your time, and your ability to fabricate lower kickstand sections (CDU bay, etc), and most importantly your available floor space.  Floor space is often a forgotten phase of your research.  Saying it will fit and 'she’ll be right mate' often 'doesn’t cut the mustard'.

My previous generic flight sim was very compact and was little larger than a desk.

Initially, I decided that a half MIP with lower kickstand and CDU bay would be ideal for my purpose; the new sim would fit perfectly into the alcove area that my current generic sim resides. 

Granted a half MIP is only a one seater and obviously wouldn't be an honest replication of a two seat aircraft, but the space savings are considerable – sometimes you need to compromise. 

Fly Engravity make an ideal half MIP, from which you can add to, as space and budget dictate.  However, the half MIP doesn’t come with full ICS (instrument integration) meaning you must wire it up yourself; for me, a somewhat daunting task in skill and time.

Flight Deck Solutions produces a half MIP with full ICS, lower kickstand and CDU bay.  But, at the time of writing this MIP is only a special order.  Therefore, if I was to have full ICS, I must purchase a full MIP with lower kickstand and CDU bay.

OEM 737-300 Throttle Quadrant

oem 737-300 throttle quadrant in tear down yard

I was surprised to find an OEM throttle quadrant, at more or less the same time that I was about to purchase a reproduction throttle.

The throttle quadrant was used in a South West 737-300 series airframe and has a two-bay center pedestal.  The two-bay pedestal will suffice until a three-bay pedestal can be found.

The pedestal still has undamaged DZUS rails so it should be an easy matter to drop in avionics panels (radios, etc).

Proposed Conversion

The Throttle quadrant will be completely dismantled, cleaned and serviced.  Parts that are not required for simulation will be removed.  The lower section of the throttle and center pedestal will be removed as this is not necessary when installing the items to flat platform.

Any cards and other items needed to convert the throttle for flight simulator will be either mounted forward of the throttle on the forward bulkhead, or be hidden from sight in the center pedestal.  USB cabling will be routed along the lower side of the throttle to emerge from the forward bulkhead, and then will be connected to a computer.

The throttle will be converted using Phidget cards and servo motors.

Although the throttle is not going to be motorised (the thrust levers will not move automatically), the use a a DC motor will enable the trim wheels to rotate and the trim tab indicators to move.

Finally, a fresh coat of paint will be applied to the throttle and pedestal and any damaged transfers replaced.

oem 737-300 throttle quadrant in tear down yard

Original Equipment Manufacture (OEM)

A major advantage when using an OEM component such as a throttle is the added realism and immersion, not too mention that it's almost impossible to break an OEM throttle. 

One thing that I found interesting when searching for the throttle quadrant, was the number of throttles that are superficially damaged or are in poor condition.  Often the throttle and pedestal is scratched, dented and stained.  Investigating this further, I learnt that it's not so much the pilots that are doing this, but the dismantling crews.  Throttles are heavy and unwieldy and a dismantling crew has little time to worry about scratching a throttle that is probably going to scrap.

I have been fortunate in that the throttle and pedestal had been removed from the scrapped aircraft relatively carefully.

The pictures shown here were sent to me by the company who dismantled the aircraft.

Update

on 2020-07-14 23:24 by FLAPS 2 APPROACH

I've just received an e-mail from Florida stating the TQ has landed safely and in good order.  Next will be the transition from a scraped throttle quadrant to a working unit.  The timeline for the conversion is around 3-4 weeks.  If everything works out as anticipated, and freight is not delayed, I am expecting delivery to Australia sometime in early October.  Everything is green for go!  :)

Update

on 2020-07-14 23:27 by FLAPS 2 APPROACH

737-300 series throttle dismantled for cleaning.  You will immediately notice the massive internal cogs that control the internal mechanism; it makes a Swiss watch mechanism dim by comparison

After returning from a work trip to east Africa, I have been told that the throttle quadrant has been refurbished and wired to connect to flight simulator.  All that's remaining is to repaint it to Boeing grey.

Rather than repaint the actual throttle levers and knobs in white to replicate the colour scheme used by a Next Generation throttle, I have opted to leave the colour of the handles as they are.  The levers and knobs of the throttle (after cleaning) were in exceptionally good condition, and it seems a shame, almost criminal to repaint them.

Therefore, although the MIP is a simulation of a Next Generation airframe, the throttle quadrant will remain as a 300 series quadrant.  In many respects, simulation is about compromise, and to destroy an historical 300 series throttle to replicate a Next Generation throttle doesn't seem the right thing to do. 

Update

on 2020-07-14 23:32 by FLAPS 2 APPROACH

Not long now...   I spoke with my friend in Florida this morning and he informed me the throttle conversion has been completed. 

The throttle will soon be travelling as cargo to Australia either by United Airlines or Qantas for I hope a late October delivery.

Update

on 2011-10-16 07:10 by FLAPS 2 APPROACH

The throttle quadrant is finished and is finally in the air winging its way from the US to Australia.  After a stint in Australian Customs, it will then be send across Bass Straight and on to Hobart - its new home.  The next phase will then be the addition of avionic panels to the pedestal and connection and configuration to flight simulator.

Boeng 737 Trip Reminder Indicator

OEM 737-800 Trip Indicator Reminder

Trip reminder indicators are an airline option that can be inserted to the upper portion of the yoke on both the Captain and First Officer side.  The indicator is a manual three digit memory device.

Initially used to remember the flight number of the flight, they were rarely used and eventually phased out of service. 

The pilot uses his thumb to move the three segmented dials to indicate the flight number.  I am told that when flight numbers began moving into 4 digits the devices were replaced with 4 digit indicators or their use discontinued.

I find the trip indicator very helpful and use it as a prompt to remember the landing speed (Vref).  After Vref has been calculated I scribe the speed into the trip indicator. 

The indicator is backlit from three 5 Volt incandescent bulbs, and it's a basic task to run a wire from the rear of the indicator through the yoke and column to a 5 volt power supply.  Other than a power wire, no other configuration needs to be done.

Although the trip reminder indicator is a very small addition, it's pieces of equipment such as this that provide increased immersion. 

Computers Ordered

I'm not a fan on computers and I'm fortunate to know a few people who can guide me through the maze of computer hardware (thanks Nat & Boyd).

Two computers are required.  One computer will be the server and this will be networked with the second computer, the client.  The server will have flight simulator installed and other add-on software, while the client computer will be dedicated to the avionics software (Sim Avionics).  The client computer will have three video graphic cards installed to enable multiple monitors that Sim Avionics require

PC's are ordered and will shortly be assembled.

Update

on 2020-07-14 13:02 by FLAPS 2 APPROACH

The computers have arrived.  WOW, these brutes look powerful and impressive.  I'll be installing flight simulator and networking them over the weekend.  Hopefully, the MIP from Flight Deck Solutions and control column from ACE Engineering will arrive soon.

Genuine 737 Throttle Quadrant - Found One

oem 737-300 throttle quadrant as removed from aircraft

After considerable research I've learnt there are very few reproduction throttles that match the functionality and robustness of the OEM throttle.

Revolution-Sim, a company in France appears to produce an exceptionally well designed quadrant, however, not with an inexpensive price tag.  Contacting Revolution-Sim is also difficult as they do not respond to e-mails.  ThrottleTec produce a very good intermediate throttle that is reasonably priced, however, the throttle's appearance is different to the OEM throttle and it looks like a toy.

Fortunately, I have been able to find an OEM 737 throttle from a aircraft tear down yard.

If I manage to purchase this throttle, my intention is to refurbish the throttle and have it retrofitted, using Phidgets, to function with flight simulator.  How this will be done eludes me for the time being.

Although motorizing the throttle so that the autothrottle moves the thrust levers is the holy grail I have been reliably informed that attempting to do so will probably cause more problems than it's worth.  Therefore, the throttle will not be motorized.   This doesn't concern me greatly as most of my virtual flying is done manually (hand flying).

I must confess that the feel of a real throttle in your hand leads no limit to the imagination!

Research & Development Completed - MIP & Yoke Ordered

R&D mode has taken considerable time with the last two weeks being almost full time.  It takes time to double check everything, scour the Internet, and wait for e-mail replies from various manufacturers.

Starting

Every project must start somewhere and I wanted to use as many OEM components in the build as possible, however, procuring components takes considerable time and I was keen to begin.  Therefore, rather than wait until everything was found, a decision was made to begin the project with a number of reproduction items.  This at least would get the project started, and as OEM components were obtained these would replace reproductions.  It would also enable me to fly the simulator more or less from the beginning of the project.

I researched a number of companies to supply the Main Instrument Panel (MIP) and two companies stood out from the rest, Flight Deck Solutions (FDS) and Fly Engravity. 

Flight Deck Solutions was chosen mainly because of support availability in Melbourne Australia, and a more reasonable Australian to Canadian monetary exchange rate.  Fly Engravity were a very close second, however the Euro is very strong and freight so expensive from Europe, that using this company became financially prohibitive.

In addition to the Main Instrument Panel, FDS will also supply some of the avionics and the avionics software (Sim Avionics). 

ACE Engineering (another Canadian company) will be supplying the reproduction 737 yoke and control column. 

I already am in possession of a the Mode Control Panel (MCP) and EFIS, both manufactured by CP Flight in Italy.  These will eventually be replaced by a more upmarket MCP and EFIS.

I've been told that delivery of the yoke and MIP will be late September (2011).

Now that the main part of the simulator has been ordered, I can begin to widen my search for additional component..

Presently, I'm talking with an individual who has a OEM Boeing 737 throttle for sale.  If negotiations are successful, I hope to purchase this quadrant. 

Update

on 2011-12-01 02:22 by FLAPS 2 APPROACH

Its taken some time, since my August order, to receive notification that the MIP I have ordered from Flight Deck Solutions is "almost" ready.  I've been told it will ship late this week so it should be in Australia by December 22 (2011).  Once the MIP has arrived, it will allow me to begin to develop the simulator.

Update

on 2011-12-07 11:25 by FLAPS 2 APPROACH

At last I've been told that the MIP I ordered from Flight Deck Solutions (FDS) in Canada has been completed.  The MIP is currently on the way to Australia via DHL air cargo.  It's been a long wait and I hope the product has been worth the lengthy waiting time.

Welcome - First Post from Flaps 2 Approach

This is the first post on Flaps 2 Approach

This website will document the building of a working Boeing 737 simulator.  This is an exciting multifaceted project that will take considerable time to complete.  I'll have to learn skills in a number of fields that, and brush up on old skills not used for sometime.  I expect I'll be phoning knowledgeable friends and asking LOTS of questions....

Also I am not a website designer or developer, so I have a lot to learn in this area as well.

The website, in addition to documenting the progress of the build, will also act as a conduit to:

  • Discuss aviation-minding subjected pertinent to the Boeing 737;

  • Discuss operational and other flight procedures used in the 737 aircraft; and,

  • Provide reviews on hardware and software pertinent to flight simulation (in particular to the 737 aircraft).

Website Name

I thought carefully about a name for the website.  Initially the usual names came to mind - 'My 737 Site' and similar.  I wanted something distinctly aviation and something that related to all aircraft.  Flaps to approach seemed the logical choice as nearly every aircraft has to set flaps to approach.  I used the numeral 2 instead of the word to enable the name to be more easily entered into a browser, and also to differentiate between setting the 'flaps to approach' and the website name.

So let's get the ball rolling..... 

- Chocks Away - or should it be 'Prepare For Landing - Flaps 2 Approach'

- Chocks Away - or should it be 'Prepare For Landing - Flaps 2 Approach'