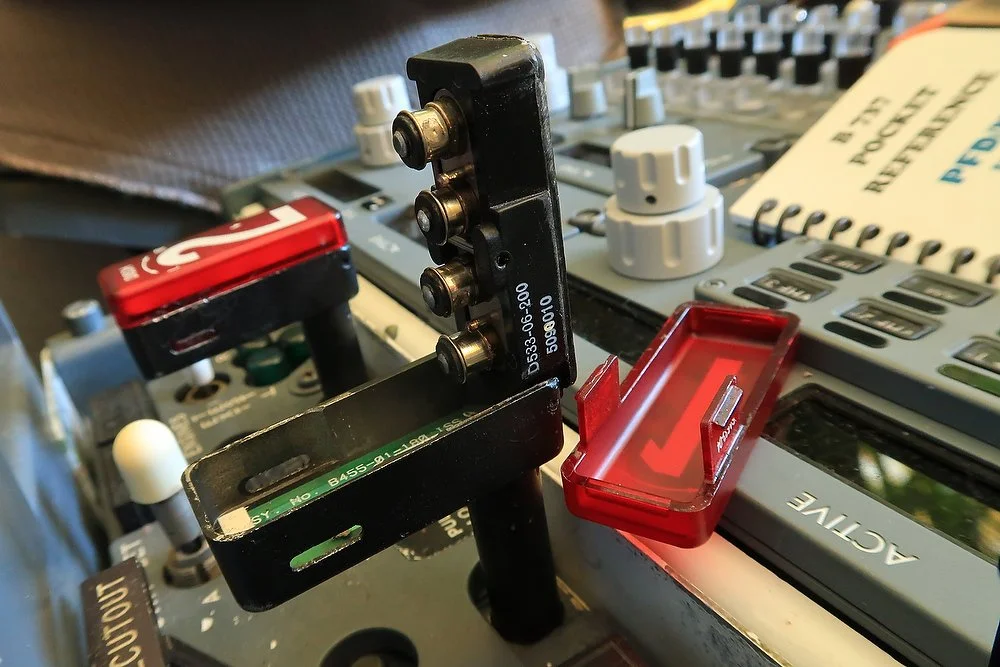
B737 Original Equipment Manufacture RMI Knobs Fully Functional

oem rmi knobs mounted to the potentiometers that control the rmi

In two previous posts, I documented the installation of two bespoke reproduction RMI knobs and aN OEM ADF/VOR switch assembly mounted in the center pedestal.  The purpose of the switch assembly, which originally was used in a Boeing 727 airframe, was to provide an easy method to switch between ADF and VOR as the two knobs mounted on the RMI were non-functional.

With the acquisition of OEM RMI knobs, the next step was to implement the functionality of these knobs by installing micro-rotary switches to the RMI frame behind each knob.  The non Next Generation compliant RMI Switch Assembly panel would then be superfluous and removed from the center pedestal.

Installing the Micro-rotary Switches to the RMI Frame

The first step was to remove the RMI frame from the MIP and enlarge the holes that the RMI knobs reside.  This is to allow the installation of the two micro-rotary switches. To do this, a Dremel rotary tool was used.   

To enable the wires from the rotary switches to be routed neatly behind the RMI frame, a very narrow trench was cut into the rear of the plastic frame.  It is very important that this task is done with due diligence as the RMI frame produced by Flight Deck Solutions (FDS) is manufactured from ABS plastic and not metal – if the cut is too deep or too much pressure is applied to the Dremel, then the frame will be damaged.

The wires from the the RMI knobs are then laid inside the earlier cut trench and aluminum-based tape is  applied over the wires.  This ensures the wires are secure and do not dislodge from the RMI frame.

The micro-rotary switches used in this conversion are 1 cm in length (depth); therefore, to use these rotaries successfully you will need to have a certain amount of airspace between the rear of the RMI frame and front of the computer screen (central display unit).  Whether there is enough room to facilitate the installation of the rotary switch, will depend upon the manufacturer of the MIP and RMI frame – some manufacturers have allowed a centimeter or so of space behind the RMI frame while others have the frame more or less flush to the center display unit screen.  If the air space is minimal, the rear of the rotary may rub against the display unit.

RMI frame and OEM knobs connected to small rotary potentiometers.  Note the metal sleeve and grub screw in the knob.

There are several methods that can be used to secure the rotaries to the RMI frame.  By far the easiest is to enlarge the hole in the RMI frame to a diameter that the rotary can be firmly pushed through the hole and not work its way loose.  Another method, more permanent, is to glue the rotary inside the hole.  No matter which method used, the rotary must be secured inside the hole otherwise when the RMI knob is turned the rotary will swivel within the hole.

Once the rotaries are installed to the frame, the OEM knobs are carefully pushed over the rotaries and the metal grub screws on the knob tightened.  One of the benefits of using OEM knobs is that the inside of the knob has a metal sleeve which ensures that the knob will not wear out and slip with continual use – reproduction knobs rarely are manufactured with an inside metal sleeve.

Interface Card and Configuration

To enable functionality, the wires from the rotaries are carefully threaded through the MIP wall and routed to an interface card; A PoKeys card, mounted in the System Interface Module (SIM), has been used.  It is not necessary to use a large gauge wire to connect the rotaries to the interface card.  This is because the electrical impulse that travels through the wire is only when the RMI knob is turned, and then it is only for a scone or so.  

The functionality for the RMI knobs is configured within the ProSim737 avionics suite in the configuration/switches area of the software.

Micro-rotary Switches

There are several micro-rotary switches available in the market.  This conversion uses A6A sealed rotary DIP switches; they are compact and inexpensive.

When selecting a rotary, bear in mind that many rotaries are either two, three or four clicks in design.  This means that for a 90 degree turn, such as required when altering the RMI from VOR to ADF, the rotary will need to travel through a number of clicks to correspond with the visual position of the switch.

The A6A type mentioned above are a two click type.  The first click will change the designation (VOR to ADF or back again), however, for realism two clicks are made (90 degree turn).  At the time of the conversion it was not possible to find a small enough rotary that was one click.  Despite this shortcoming, the physical clicks are not very noticeable.

This conversion is very simple and is probably one of the easiest conversions that can be done to implement the use of OEM knobs.  There is minimal technical skill needed, but a steady hand and a good eye is needed to ensure the RMI frame is not damaged when preparing the frame for the installation of the two rotary switches.

oem rmi knobs in original plastic bag. note metal inner sleeve and grub screw

OEM RMI Gauge

This  conversion uses two OEM RMI knobs and rotaries to interface with the standard virtual RMI gauge provided within the ProSim737 avionics suite.  Converting an OEM RMI gauge for standalone operation is possible and has been accomplished by other enthusiasts; however, whether a full RMI conversion can be done very much depends upon your particular simulation set-up.

If a OEM RMI gauge is installed, there may be a spacing issue with the other alternate gauges.  In particular, the Integrated Standby Flight Display (ISFD) will require a smaller dedicated display screen.  Likewise, the EICAS display screen will need to be smaller so as to fit between the RMI gauge and the landing gear assembly.  Also, an extra display port will be required for the computer to read the ISFD display screen. 

Certainly, a complete conversion of a RMI gauge is the best way to proceed, if you already own a OEM RMI unit, and if the set-up problems are not too difficult to overcome.

Acronyms

  • MIP – Main Instrument Panel

  • OEM – Original Equipment Manufacturer

  • RMI – Radio Magnetic Indicator
ANZAC Day - Lest We Forget

Royal New Zealand Fighter Pilots circa Second World War.  New Zealand and Australia have always been close allies. ANZAC is the abbreviation for Australian and New Zealand Army Corps. 15 Squadron at Whenuapai NZ about late September 1942

In Australia, April 25th is known as ANZAC Day.  ANZAC day began in 1916 and initially was a part day holiday to reflect on those soldiers, who in the First World War had lost their lives in Gallipoli.  Over the years, the day has become one in which to reflect on all those from all services and corps who have lost their lives in military conflicts that Australia has been involved in. 

The significance of ANZAC Day to many Australians, is as a day in which to reflect on the courage and sacrifice of others, and the fact that Gallipoli and other similar actions helped to forge Australia as a nation - a nation that came into being as the Commonwealth of Australia in 1901.

What is the connection between ANZAC Day and the building of a B737-800 flight simulator or for that matter aviation in general?

The carnage of war was one of the main catalysts to the evolution of many new innovations of which aviation was but one.  Of importance. was the emergence of the Australia Flying Corps (AFC) which was the forerunner of the Royal Australian Airforce (RAAF).

Hudson Fysh standing beside one of the first QANTAS aircarft

QANTAS

Emerging from the hell of the Great War came three Australians (Fysh, M’Ginness and McMaster) who, toughened by war, hardship and bonded by mateship, developed what would be the second oldest airline in the world.  In 1920 the trio formed the Queensland and Northern Territory Aerial Services Ltd, or QANTAS.

Hudson Fysh was born in Launceston, Tasmania, on 7 January 1895. He enlisted with the 3rd Light Horse Regiment, at the outbreak of World War I and saw active service at Gallipoli, Sinai and Palestine before transferring to the Australian Flying Corps. He was commissioned at a lieutenant and served as an air gunner with No. 1 Squadron AFC in Palestine and received a Distinguished Flying Cross for his gallantry in air combat and attacking ground targets in late 1918.

Fysh and M'Ginness in AFC attire circa 1918

Paul McGinness was born at Framlingham, Victoria, on 4 February 1896. He joined the 8th Light Horse Regiment in 1914 as a trooper. After training in Egypt, he served at Gallipoli where he was one of the few survivors of the charge at The Nek in August 1915 and was wounded. He later received the Distinguished Conduct Medal for scouting and leadership in the Sinai desert in 1916.

.Fergus McMaster fought in the Great War as a gunner with the 7th Battery, 3rd Brigade, Australian Field Artillery at Amiens, Villers-Bretonneux and Hamel.

W Arthur Baird was not a founding a member of QANTAS; however, his engineering skill was vital to the early success of the air service.  Baird joined the Australian Flying Corps and served as a flight sergeant in Palestine with No. 1 Squadron AFC where he met Paul McGinness and Hudson Fysh. He was awarded the Meritorious Service Medal (MSM) for his ability to maintain aero engines in difficult conditions, and Baird was an obvious choice to keep the aircraft flow by QANTAS in the air.

Lest We Forget.

Boeing Nut Cracker - Loosening Stab Trim Wheel Nuts

Boeing Nut Cracker - two raised lugs fit firmly into their opposite number to enable the stab trim wheel nut to be easily loosened or tightened

Any industry has tools that have been designed for a specific task – whether it is for automotive, construction or aviation.  

Specialist tools enable a particular job to be accomplished quickly and effectively with the minimum of fuss.  More importantly, damage to a part is less likely when using a specialised tool. 

A person who makes tools usually has a trade certificate and those who are gifted in this area are called boiler makers; a gifted boiler maker can literally make anything.

Captain-side stab trim wheel nut showing recessed indentations on the nut.  The screwed rod (tip showing in photograph) is ~40 cm in length and is inserted through one of the  trim wheels, through the throttle quadrant, and is then secured by the unique nut on the opposite trim wheel

Stab Trim Wheel Nut

The stab trim wheels have two nuts that hold the trim wheels in place - one on each side of the throttle quadrant.  When attempting to remove the trim wheel nut it is a good idea to use a tool, as the nut can be easily damaged (burred).

The nut has two shallow indentations each side of it to enable it to be firmly tightened. 

Often the nut is over-tightened by the continual rotation of the trim wheels, or by an overzealous technician applying more force than they should.  If the nut has been over tightened, removing the trim wheels can be difficult. 

A common man’s blade screwdriver can be used to loosen the nut, by applying the blade to one side of the two indentations, grasping the trim wheel firmly and turning the driver.  But, do not be surprised if the recessed indents are damaged, the screwdriver slips and scratches something, or worse you end up with the blade of the screwdriver through your hand!

Boeing Specialised Tool

Boeing technicians use a specialised tool to loosen and tighten the nuts that hold the trim wheels in place – no doubt it also has a special name (?).  This tool, like all specialist tools is expensive, and more so because it is used in the aviation industry. 

I explained the problem to a friend of mine who like a ‘genie in a bottle’, designed and made this small tool for me.  It is not fancy or technical, but it does the job it has been designed to do especially well – every time. 

The tool is made from aluminium with two raised indentations that fit into the two recessed indentations on the trim wheel nut.  A simple shaft placed through a drilled hole in the stem of the tool enables the user to apply enough leverage to 'crack' all but the most resistant of trim wheel nuts. 

The heavy duty cog wheel that the trim wheels are secured to.  When removing the trim wheels it is very important not to dislodge the cog as the bearings on the inner side of the cog will fall out of alignment

Caution - Removing the Trim Wheels from the Main Shaft 

Whenever the trim wheels have to be removed from the throttle quadrant, it is very important not to dislodge the cog by pushing or pulling the shaft through the throttle unit.  This is relatively easy to do as often the trim wheels adhere to the cog.

Attached to the cog (inside the throttle unit) are several bearings, which if dislodged, will fall out of alignment.  The bearings are important to the correct functioning of the trim wheels and it is very difficult, if not impossible, to reinstall the bearings after they have fallen out of place.

When removing the trim wheels, carefully 'jiggle' the trim wheel until it works its way loose of the cog - never forcefully pull the trim wheel outwards as the cog and shaft may come out of the throttle unit, allowing the bearings to fall out of alignment.  Furthermore, be mindful that when you remove one of the trim wheels the other may rotate forward or backwards due to centrifugal force.

Before replacing the trim wheels, to help avoid the wheel from sticking to the shaft and cog, apply an amount of grease to the cog teeth.

Update

on 2016-05-26 00:01 by FLAPS 2 APPROACH

This tool has now been replaced with a new design with better engineering.  To read about the new tool:  Trim Wheel Nut Tool - New Design.

Throttle Quadrant Rebuild - Clutch, Motors, and Potentiometers

Captain-side of throttle quadrant showing an overview of the new design.  The clutch assembly, motors, and  string potentiometer can be seen, in addition to a portion of the revised parking brake mechanism

An earlier article, Throttle Quadrant Rebuild – Evolution Has Led to Major Changes has outlined the main changes that have been made to the throttle quadrant during the rebuild process. 

This article will add detail and explain the decision making process behind the changes and the advantages they provide.  As such, a very brief overview of the earlier system will be made followed by an examination of the replacement system.

Limitation

It is not my intent to become bogged down in infinite detail; this would only serve to make the posts very long, complicated and difficult to understand, as the conversion of a throttle unit is not simplistic.

This said, the provided information should be enough to enable you to assimilate ideas that can be used in your project.  I hope you understand the reasoning for this decision.

The process of documenting the throttle quadrant rebuild will be recorded in a number of articles.  In his article I will discuss the clutch assembly, motors, and potentiometers. 

Why Rebuild The Throttle Quadrant

Put bluntly, the earlier conversion had several problems; there were shortfalls that needed improvement, and when work commenced to rectify these problems, it became apparent that it would be easier to begin again rather than retrofit. Moreover, the alterations spurred the design and development of two additional interface modules that control how the throttle quadrant was to be connected with the simulator.

TIM houses the interface cards responsible for the throttle operation while the TCM provides a communication gateway between TIM and the throttle.

Motor and Clutch Assembly - Poor Design (in previous conversion)

The previous throttle conversion used an inexpensive 12 volt motor to power the thrust lever handles forward and aft.  Prior to being used in the simulator, the motors were used to power electric automobile windows.  To move the thrust lever handles, an automobile fan belt was used to connect to a home-made clutch assembly.

This system was sourly lacking in that the fan belt continually slipped.  Likewise, the nut on the clutch assembly, designed to loosen or tighten the control on the fan belt, was either too tight or too loose - a happy medium was not possible.   Furthermore, the operation of the throttle caused the clutch nut to continually become loose requiring frequent adjustment.

The 12 volt motors, although suitable, were not designed to entertain the precision needed to synchronize the movement of the thrust levers; they were designed to push a window either up or down at a predefined speed on an automobile.

The torque produced from these motors was too great, and the physical backlash when the drive shaft moved was unacceptable.  The backlash transferred to the thrust levers causing the levers to jerk (jump) when the automation took control (google motor backlash).

This system was removed from the throttle.  Its replacement incorporated two commercial motors professionally attached to a clutch system using slipper clutches.

Close up image of the aluminium bar and ninety degree flange attachment.  The long-threaded screw connects with the tail of the respective thrust lever handle. An identical attachment at the end of the screw connects the screw to the large cog wheel that the thrust lever handles are attached

Clutch Assembly, Connection Bars and Slipper Clutches - New Design

Mounted to the floor of the throttle quadrant are two clutch assemblies (mounted beside each other) – one clutch assembly controls the Captain-side thrust lever handle while the other controls the First officer-side. 

Each assembly connects to the drive shaft of a respective motor and includes in its design a slipper clutch.  Each clutch assembly then connects to the respective thrust lever handle.  A wiring lumen connects the clutch assembly with each motor and a dedicated 12 volt power supply (mounted forward of the throttle quadrant).  See above image.

Connection Bars

diagram 1: crossection and a cut-away of a slipper clutch

To connect each clutch assembly to the respective thrust lever handle, two pieces of aluminium bar were engineered to fit over and attach to the shaft of each clutch assembly. 

Each metal bar connects to one of two long-threaded screws, which in turn connect directly with the tail of each thrust lever handle mounted to the main cog wheel in the throttle quadrant. 

Slipper Clutches

close up of slipper clutch showing precision ball bearings

A slipper clutch is a small mechanical device made from tempered steel, brass and aluminum.  The clutch consists of tensioned springs sandwiched between brass plates and interfaced with stainless-steel bearings.  The bearings enable ease of movement and ensure a long trouble-free life.

The adjustable springs are used to maintain constant pressure on the friction plates assuring constant torque is always applied to the clutch.  This controls any intermittent, continuous or overload slip.

A major advantage, other than their small size, is the ease at which the slipper clutches can be sandwiched into a clutch assembly.

Anatomy and Key Advantages of a Slipper Clutch

A number of manufacturers produce slipper clutches that are specific to a particular industry application, and while it's possible that a particular clutch will suit the purpose required, it's probably a better idea to have a slipper clutch engineered that is specific to your application. 

The benefit of having a clutch engineered is that you do not have to redesign the drive mechanism used with the clutch motors.

Key advantages in using slipper clutches are:

  • Variable torque;

  • Long life (on average 30 million cycles with torque applied);

  • Consistent, smooth and reliable operation with no lubrication required;

  • Bi-directional rotation; and,

  • Compact size.

The clutch assembly as seen from the First Officer side of the throttle quadrant.  Note the slipper clutch that is sandwiched between the assembly and the connection rods.  Each thrust lever handle has a dedicated motor, slipper clutch and connection rod.  The motor that powers the F/O side can be seen in the foreground

Clutch Motors

The two 12 Volt commercial-grade motors that provide the torque to drive the clutch assembly and movement of the thrust lever handles, have been specifically designed to be used with drives that incorporate slipper clutches.

In the real world, these motors are used in the railway and marine industry to drive high speed components.  As such, their design and build quality is excellent. The motors are designed and made in South Korea.

Each motor is manufactured from stainless steel parts and has a gearhead actuator that enables the motor to be operated in either forward or reverse.  Although the torque generated by the motor (18Nm stall torque) exceeds that required to move the thrust lever handles forward and aft, the high quality design of the motor removes all the backlash evident when using other commercial-grade motors.  The end result is an extraordinary smooth, and consistent operation when the thrust lever handles move.

A further benefit using this type of motor is its size.  Each motor can easily be mounted to the floor of the throttle quadrant; one motor on the Captain-side and the second motor on the First Officer-side.  This enables a more streamlined build without using the traditional approach of mounting the motors on the forward firewall of the throttle quadrant.

captain-side 12 Volt motor, wiring lumen and dual string potentiometer that control thrust levers

String Potentiometers - Thrust Levers 1/2

Two Bourne dual-string potentiometers have been mounted in the aft section of the throttle unit.  The two potentiometers are used to accurately calibrate the position of each thrust lever handle to a defined %N1 value.  The potentiometers are also used to calibrate differential reverse thrust.

The benefit of using Bourne potentiometers is that they are designed and constructed to military specification, are very durable, and are sealed.  The last point is important as sealed potentiometers will not, unlike a standard potentiometer, ingest dust and dirt.  This translates to zero maintenance.

Traditionally, string potentiometers have been mounted either forward or rear of the throttle quadrant; the downside being that considerable room is needed for the operational of the strings.  

In this build, the potentiometers were mounted on the floor of the throttle housing (adjacent to the motors) and the dual strings connected vertically, rather than horizontally.  This allowed maximum usage of the minimal space available inside the throttle unit.

Automation, Calibration and Movement

The automation of the throttle remains as it was.  However, the use of motors that generate no backlash, and the improved calibration gained from using string potentiometers, has enabled a synchronised movement of both thrust lever handles which is more consistent than previously experienced.

Reverse Thrust 1/2

Micro-buttons were used in the previous conversion to enable enable reverse thrust - reverse thrust was either on or off, and it was not possible to calibrate differential reverse thrust. 

Dual Bourne string potentiometer that enables accurate calibration of thrust lever handles and enables differential thrust when reversers are engaged

In the new design, the buttons have been replaced by two string potentiometers (mentioned earlier).  This enables each reverse thrust lever to be accurately calibrated to provide differential reverse thrust.  Additionally, because a string potentiometer has been used, the full range of movement that the reverse thrust is capable of can be used.

The video below demonstrates differential reverse thrust using theProSim737 avionics suite. The first segment displays equal reverse thrust while the second part of the video displays differential thrust.


Calibration

To correctly position the thrust lever handles in relation to %N1, calibration is done within the ProSim737 avionics software  In calibration/levers, the position of each thrust lever handle is accurately ‘registered’ by moving the tab and selecting minimum and maximum.  Unfortunately, this registration is rather arbitrary in that to obtain a correct setting, to ensure that both thrust lever handles are in the same position with identical %N1 outputs, the tab control must be tweaked left or right (followed by flight testing).

When tweaked correctly, the two thrust lever handles should, when the aircraft is hand-flown (manual flight), read an identical %N1 setting with both thrust levers positioned beside each other.  In automated flight the %N1 is controlled by the interface card settings (Polulu JRK cards or Alpha Quadrant cards).

Have The Changes Been Worthwhile

Comparing the new system with the old is 'chalk and cheese'.  

One of the main reasons for the improvement has been the benefits had from using high-end commercial-grade components.  In the previous conversion, I had used inexpensive potentiometers, unbalanced motors, and hobby-grade material.  Whilst this worked, the finesse needed was not there.

One of the main shortcomings in the previous conversion, was the backlash of the motors on the thrust lever handles.  When the handles were positioned in the aft position and automation was engaged, the handles would jump forward out of sync.  Furthermore, calibration with any degree of accuracy was very difficult, if not impossible. 

The replacement motors have completely removed this backlash, while the use of string potentiometers have enabled the position of each thrust lever handle to be finely calibrated, in so far, as each lever will creep slowly forward or aft in almost perfect harmony with the other.

An additional improvement not anticipated was with the installation of the two slipper clutches.  Previously, when hand-flying there was a binding feeling felt as the thrust lever handles were moved forward or aft.  Traditionally, this binding has been difficult to remove with older-style clutch systems, and in its worst case, has felt as if the thrust lever handles were attached to the ratchet of a bicycle chain.

The use of high-end slipper clutches has removed much of these feeling, and the result is a more or less smooth feeling as the thrust lever handles transition across the throttle arc.

Future Articles

Future articles will address the alterations made to the speedbrake, parking brake lever, and internal wiring, interfacing and calibration.  The rotation of the stab trim wheels and movement of the stab trim indicator tabs will be discussed.

This article is one of several that pertain to the conversion of the OEM throttle quadrant. A summary page with links can be viewed here: OEM Throttle Quadrant

Update

on 2018-04-11 01:08 by FLAPS 2 APPROACH

This article was not able to be published at an earlier time because of issues with confidentiality and potential patents.  The article has been re-written (March 2018). 

OEM Annunciators Replace Reproduction Korrys in Main Instrument Panel (MIP)

There can be little doubt that OEM annunciators shine far brighter than their reproduction counterparts.  The korrys are lit during the lights test. OEM Flaps gauge yet to be installed

A task completed recently has been the replacement of the reproduction annunciators located on the Main Instrument Panel (MIP) with OEM annunciators. 

The reason for changing to OEM annunciators was several-fold.  First, anything OEM is superior to a reproduction item.  Second, I wanted to reproduce the same korry annuciation  lighting observed in the OEM panels in the center pedestal, fire suppression panel, and when fitted, the forward and aft overhead panels.  Additionally, it was also to enable the push-to-test functionality and to provide better illuminance during daylight.  Some reproduction korrys are not that bright when annunciated and are difficult to see during the day.

This post will explain the anatomy of the annunciators that are fitted to the Main Instrument Panel (MIP).  It will also detail how the annunciators are wired and configured in ProSim737, and provide incite into some of the advantages and functionality that can be expected when using OEM annunciators.

The individual indexing can be observed on the top surface of the upper assembly (3 groves).  To separate the two assemblies a hex screw must be used to loosen the hex screw located inside the brass-coloured circular fitting.  Note that this is a new style LED korry which does not support the older incandescent bulbs

Anatomy of a Annunciator (Korry)

An annunciator is a light which is illuminated when a specific function occurs on the aircraft.  Annunciators are often called by the generic name ‘Korry’, as Korry is the registered trademark used by a company called Esterline that manufactures annunciators for the aero and space industry. 

There are two types of annunciators used in the Boeing aircraft, the 318 and the 319 which are either a Type 1 or Type 2 circuit. 

The 318 and 319 Korrys are not interchangeable.  Each Korry has a different style of bulb, differing electrical circuits, and a different method of internal attachment (captive hex screw verses two blade-style screws).  The only similarity between the 318 and 319 korrys is that the hole needed to house the korry in the MIP is identical in size - .440” x .940”.  The 318 Korry replaced the 319 Korry.

The circuit type refers to the electrical circuit used in the Korry.    Both circuit types require a ground-controlled circuit to turn it on, however, Type 1 circuits are ground-seeking while Type 2 circuits are power-seeking.    Visually (when installed to the MIP) the 318 and 319 korrys are indiscernible.

Annunciators have five parts that comprise:

(i)     The lower assembly and terminals (usually four terminals in number);

(ii)    The upper assembly;

(iii)    The outer housing/sleeve which has a lip to allow a firm connection with the MIP;

(iv)    The push-in light plate which includes the bulbs; and,

(v)    The legend, which incorporates a replaceable coloured lens.

The four terminal connections on the rear of each annunciator are specific to the functionality of the unit.  Each will exhibit a differing circuit dependent upon its function.  Likewise, each annunciator is individually indexed to ensure that the upper assembly cannot be inadvertently mated with the incorrect lower assembly.

Annunciators typically are powered by 28 Volts, use two incandescent ‘push-in style’ bulbs, and dependent upon the korry’s function, may have a light plate coloured amber, white red or green.  The legend is the name plate, and legends are usually laser engraved into the light plate to ensure ease of reading.  The engraved letters are in-filled with colour to allow the printing to stand out from the light plate’s lens colour.

Specialised Korry

The Boeing 737 aircraft uses a Korry, a type 318, that is slightly different to the standard Korry. This Korry enables the functionality for the BELOW G/S – P-Inhibit function.  

The Type 318 differs from other korrys used in the MIP in that it has a dry set of momentary contacts which are controlled by pressing the light plate.  Pressing the illuminated light plate extinguishes the annunciator and cancels the aural ‘Below Glideslope’ caution.

Reproduction Verses Original Equipment Manufacture (OEM)

The four biggest differences between reproduction and OEM annunciators are:

(i)     The ability to depress the light plate in the OEM unit for Push-To-Test function;

(ii)    The ability to replicate specific functions, for example the Below G/S P-Inhibit korry;

(iii)    The hue (colour) of the lens and crispness of the legend; and,

(iv)    The brightness of the annunciator when illuminated (5 volts verses 28 volts).

Reproduction Korry Shortfalls

Two areas lacking in reproduction units is the brightness of the annunciator when illuminated, and poorly defined legends.  

For the most part, reproductions use 5 volts to illuminate two LEDS located behind the lens.  Whilst it is true that the use of LED technology minimises power consumption and heat generation, the brightness of the LEDS, especially during the day,  may not be as bright as the two 28 volt incandescent bulbs used in an OEM annunciator.   Moreover, 5 volts does not allow the successful use of DIM functionality.  

It is unfortunate that many lower priced annunciators also lack well defined engraved lens plates making the ability to read the annunciator legend difficult at best.

Shortfalls notwithstanding, most high-end reproduction annunciators are of high quality and do the job very well.  


Table 1: quick reference to determine the main differences between OEM and reproduction annunciators. Note that the appearance of the annunciator can alter markedly between different manufacturers of reproduction units


Installation, Interfacing and Configuration of OEM Annunciators

Replacing a reproduction annunciator with its OEM counterpart is straightforward if the Main Instrument Panel (MIP) has been produced 1:1; however, reproduction MIPs are rarely exactly 1:1 and in all probability you may need to enlarge the hole that the annunciator resides.  If this is the case, ensure you use a fine-grade aluminum file and gentle abrade the hole to enlarge it.  When enlarging the hole, ensure you continually check the hole size by inserting the korry – if the hole is enlarged too much, the korry will be loose and will require additional methods to secure to the MIP.

korry system 318 type 1

Disassembling a Korry

It is important to understand how to unassemble the annunciator.  

First, the light plate has to be gently pried loose from the upper assembly.  Once this is done, the upper and lower assemblies must be separated to allow the outer/sleeve to be removed.  The Type 318 annunciators have a hex screw, located in the lower assembly unit, which needs to be loosened with a 5/64th hex wrench to allow separation, while the Type 319 annunciators are secured by two standard screws that require a small blade screwdriver.  

Once the two parts are separated, it should be noted that the upper assembly has a flange at the forward end; this flange enables the annunciator to be firmly connected to the MIP.   

Attaching a Korry to the MIP

Is your MIP 1:1 and will it fit OEM korrys without further to do?  Click the diagram to see the dimensions of korrys (with thanks to Mongoose for diagram)

Insert the upper assembly into the MIP flange facing forward.  Next, slide the housing over the rear of the mechanism from the rear of the MIP.  Rejoin the lower section and tighten the hex screw.    If the MIP is 1:1, the annunciator should now be firmly secured to the MIP wall. The light plate can now be pushed into the mechanism.

If the annunciator does not fit firmly into the MIP, it can be secured by using silastic or a glue/metal compound.  (I do not recommend this.  It is best to ensure the hole is the correct size or a tad too small.  This will guarantee that the annunciator will have a firm fit).

Provided the mechanism is not faulty or does not break, the chance that it will need to remove it is very remote.  If the bulbs fail, they are easily replaced as they are contained within the light plate.

Wiring - Procedure

Wiring the MIP annunciators is a convoluted and repetitious process that involves daisy-chaining the various annunciators together.  Because wiring is to and from four terminals, it can be difficult to remember which wire goes where.  As such, it is recommended to use coloured wire, label each wire and keep meticulous notes.  

Each annunciator has four terminals located on the rear of the unit that corresponds to:

(i)      Positive (28 volts);

(ii)     Logic for the function of the korry;

(iii)    Lights test; and,

(iv)    Push-To-Test.  

To crosscheck the above, each Type 2 korry has a circuit diagram stenciled on the side of the assembly.


Figure 1: A schematic of the three types of korrys used in the Boeing 737.  The left diagram is from the 318 push to inhibit korry (diagram copyright David C. Allen


For the OEM korrys to function correctly, they need to be connected with an interface card (I/O card).  An example of such a card is a Phidget 0/16/16 card.

(i)    Designate the annunciator closest the I/O card and power supply as the lead annunciator (alpha).  

(ii)    Terminal 1 and Terminal 4 are the power terminals for each korry.  Connect to the alpha korry the positive wire from the 28 Volt power supply to terminal 1 and the 28 Volt negative wire to terminal 4.  The wires from these two terminals are then daisy-chained to the identical terminals on the other korrys in the system.

(iii)    Terminal 2 controls the logic behind the function for each korry.  A wire must connect from terminal 2 of each korry to the output side of the I/O card.  To close the loop in the I/O card, a wire is placed from 28 Volts negative to the ground terminal on the card (input).

(iv)    Terminal 3 controls the logic behind the light test toggle.  A wire is daisy-chained from terminal 3 of the alpha korry to all other korrys in the system.  A wire is then extended from the final korry to the lights test toggle switch.  This switch has been discussed in detail in a separate post.

Quite a bit of wire will be needed to connect the thirteen or more annunciators and it is a good idea to try and keep the wire neat and tidy by using a lumen to secure it to the rear of the MIP.

Mounting and Brackets

Every simulator design is different, and what is suitable for one set-up may not be applicable to another.  

The I/O card that is used to control the MIP annunciators is mounted within the System Interface Module (SIM).  To this a straight-through cable is securely attached that connects to a D-Sub connector mounted on an aluminum bracket.  The bracket and two terminal blocks are strategically mounted on the rear of the MIP and enable the various wires from the korrys to connect with the straight-through cable.

Interfacing and Configuration Using ProSim737

To interface the annunciators, follow the directions on how to wire your I/O card.

This article provides information on the Phidget 21 Manager (software) and how a Phidget interface card is used.

If the annunciators have been correctly daisy-chained together, only the wires from terminal 2 of each korry will need to be connected to Phidget card.  When power is applied, the Phidgets software will automatically assign outputs to any device (korry) attached to the 0/16/16 card.  

To determine the digital output number for each annunciator, open the Phidgets 21 Manager, push the light plate on a chosen annunciator and record the allocated output number.  The output numbers are used by ProSim737 to allocate that annunciator to a specific software command line.  

Configuring the MIP annunciators in ProSim737 is a two-step process.  First, the annunciator must be assigned as a switch (for the puhs- to-test function to operate), then as an indicator (for the annunciator to illuminate).  Before commencing, check that Phidgets have been assigned in the driver section of the configuration section of the main ProSim737 menu.  

Open the configuration screen and select switches and scroll downwards until you find the appropriate switch that corresponds to the annunciator.  Assign this switch to the output number assigned by the Phidgets software (If you have multiple Phidget cards installed ensure the correct card is assigned).  

After this has been completed, continue the configuration process by assigning each annunciator to the appropriate indicator in the configuration/indicators section.

Lights Test

A lights test is used to determine whether all the annunciators are operating correctly.  A lights test can be accomplished two ways. 

The first method is to press the light plate of an annunciator which operates a momentary switch that causes the light to illuminate (push-to-test).  This is an ideal way to determine if an individual annunciator is working correctly.

The second method is to use the MIP toggle switch.  Engaging the toggle switch to the on position will illuminate all the annunciators that are connected to the toggle switch.  This is an excellent way to ensure all the annunciators are operational and is standard practice before beginning a flight.

It should be noted that for all the annunciators to illuminate, each korry must be connected to the toggle switch. 

An earlier post explained the conversion and use of a OEM Lights Test Toggle Switch.

The fire suppression panel annunciators are also korrys.  Like their MIP sisters, the korrys are very bright when illuminated as they are powered by 28 volts

Korry Systems

This post has discussed the main annunciators on the MIP which is but one system.  Other systems include the annunciators for the forward and aft overhead annunciators, fire suppression panel and several other panels.

To connect additional systems to the enable a full lights test to be done, an OEM aircraft high amperage relay can be used.  

OEM multi-relay device.  The relay from a Boeing aircraft is not necessary; any aircraft relay will suffice.  It's wise to choose a relay that has multiple connection posts as this will enable different systems to be connected to the relay.  The relay is easily fitted to the rear of the MIP or to the inside of the center pedesta

Depending upon the type of relay device used (there are several types), it may be possible to connect up to three systems to the one relay.  This is made possible by the OEM toggle switches unique multi-segment system, and the ability of the relay to handle high amperage from multiple aircraft systems.

A benefit of using an OEM relay is that it provides a central point for all wires from the various systems to attach, before connecting to the lights test toggle switch.  Note that 28 volts bmust be connected directly to the relay for correct operation.

The relay will, depending upon the throw of the toggle switch (lights test), open or close the circuit of the relay.  Opening rhe relay circuit (when the light test toggle is thrown) enables 28 volts to flow through the relay and illuminate any annunciators connected to the system.

Availability

The Korrys originally were used in British Airways 737-400 Airframe 25843 G-DOCM (copyright Aero icarus)

Fortunately, apart from a few functions, there is little difference between older style annunciators used in the classic series airframes and those used in the Next Generation aircraft - an annunciator is an annunciator no matter from what airframe (100 series, Classic or Next Generation).

Annunciators are relatively common and are often found ion e-Bay.  However, to acquire a complete collection that is NG compliant can be time consuming, unless a complete panel is purchased and the annunciators removed.

Lineage

The annunciators used in the simulator came from a B737-400 airframe.   This aircraft - serial number N843BB and construction number 25843 had a rather interesting lineage. 

It began service life in March 1992 with British Airways as G-DOCM before being transferred to Fly Dubai and Air One in 2004.  Late 2004 the airframe was purchased by Ryan International and the registration changed to N843BB.  Between 2005 and 2010 the aircraft was leased to the Sundowner LCC who at the time was contracted to the US Dept. of Justice.   The aircraft was returned to Ryan International mid 2010 and subsequently scrapped.

Acronyms

New Interface Modules

My friend and I have not been sitting idle.  Part of the upgrade to the simulator has been additional interface modules.

In early 2014, an Interface Master Module (IMM) was constructed to trial the modular concept.  This module housed most of the interface cards and relays that, at the time, were used in the simulator.  This trail was successful.  The single trial IMM has now been discarded and has been replaced with the:

Information concerning each of these modules, including an introduction to the modular concept, can be found in a new section named Interface Modules.  Interface Modules can be assessed from the main menu tabs located at the top of each website page (the brown banner).

It has taken considerable time to design and construct, and then interface these modules to the simulator.  To some, the process may appear complex and convoluted.  However, in the long term the idea is sound and a centralized area offers considerable advantages.

I hope you enjoy reading about the new modular systems.

Throttle Quadrant Rebuild - Evolution Has Led to Major Alterations

oem 737-500 thrust levers

Two major changes to the simulator have occurred.  The first concerns the throttle quadrant and the second is the replacement of the trial Interface Master Module with a more permanent modular solution.  The changes will be documented in the near future after final testing is complete.

The throttle quadrant has been completely rebuilt from the ground up.  Although the outside may appear identical to the earlier quadrant, the rebuild has replaced nearly everything inside the quadrant and the end product is far more reliable than its predecessor.

The throttle unit, in its previous revision, worked well, but there were several matters which needed attention.  The automation and functionality was adequate, but could be improved upon.  There were also 'niggling' issues with how the clutch assembly operated - it was somewhat loose which caused several flow-on problems.

Initially, some minor improvements were to be made; however, one thing lead to another and as 'fate would have it' the throttle unit has been rebuilt from the bottom up.

Improvements

The improvements have primarily been to the automation, the autothrottle and the speedbrake system.  However, during the rebuild other functionality have been improved: the synchronised tracking movement of the thrust levers is now more consistent and reliable, and an updated system to operate the parking brake has also been devised.  This system replicates the system used in the real aircraft in which the toe brakes must be depressed before the parking lever can set or disengaged.

Furthermore, the potentiometers controlling the movement of the flaps and thrust levers have been replaced with string potentiometers which increases the throw of the potentiometer and improves accuracy.  The calibration of the flaps and speedbrake is now done within the system, removing the need for 'tricky' calibration in FSUIPC. 

In the previous throttle version there was an issue with the speedbrake not reliably engaging on landing.  This in part was caused by a motor that was not powerful enough to push the lever to the UP position with consistent reliability.  This motor has been replaced with a motor more suitable to the power requirement needed.  The speedbrake is mechanical, mimics the real counterpart in functionality, nd does not require software to operate.

This throttle conversion has maintained the advanced servo card and motor that was used to control the movement of the stab trim tabs (trim indicators); however, the motor that provides the power to rotate the trim wheels has been replaced with a more reliable motor with greater power and torque.  The replacement motor, in conjunction with three speed controller interface cards, have enabled the trim wheels to be rotated at four independent speeds.  This replicates the four speeds that the wheels rotate in the real 737 -800 aircraft.

Finally, the automotive fan-belt system/clutch system which was a chapter from the 'Dark Ages' has been replaced with two mechanical clutch assemblies that has been professionally designed to operate within the throttle unit - this will completely remove any of the 'niggles' with the previous clutch assembly becoming loose and the fan belt slipping.  Each thrust lever has a dedicated poly-clutch and separate high powered motor. 

A brief list of improvements and changes is listed below:

  • Next Generation skirt replaced with more accurate skirt (prototype);

  • Reproduction TO/GA buttons replaced with OEM square TO/GA buttons;

  • Fan belt driven clutch system replaced with slipper clutch system;

  • motors replaced that control lever movement and trim wheels;

  • 95% of wiring re-done to incorporate new interface modules;

  • Replacement interface alert system;

  • Flap potentiometers replaced by string potentiometers;

  • Speedbrake potentiometer replaced by linear potentiometer;

  • Thrust levers potentiometers replaced by dual string potentiometers;

  • Internal mechanism altered to stop noise of chain hitting throttle frame;

  • Thrust lever tracking movement accuracy improved;

  • Thrust reversers now have proportional thrust for each lever 1 and 2; and

  • The parking brake mechanism replaced with a more accurate system that reflects that used in the real aircraft

The conversion of the throttle quadrant has been a learning process, and the changes that have been done improve the unit's functionality and longevity - not too mention accuracy, far beyond what it was previously.

Dedicated Interface Modules

The throttle previously interfaced with the Interface Master Module (IMM).  The IMM was developed as a trial module to evaluate the modular concept.

The throttle quadrant will now directly interface with two dedicated modules called the Throttle Interface Module (TIM) and Throttle Communication Module (TCM).  Both of these modules contain only the interface cards, relays and other components required to operate the throttle and automation.  Additionally, the system incorporates a revised Interface Alert System which evolved from the original concept used in the IMM.

To read more concerning the various interface modules, a new website section has been produced named Interface Modules.  This section is found in the main menu tabs at the top of each page.

Flight Testing (March 2015)

The throttle and replacement interface modules are currently being evaluated and minor issues rectified.

Once testing is complete, the alterations undertaken during the rebuild process will be documented in separate posts and, to facilitate ease of searching, links will be added to the flight controls/throttle quadrant section.

It should be noted that the work done to rebuild the throttle was done with the help a friend, who has a through knowledge of electronics and robotics.

Autobrake System - Review and Procedures

air berlin 737-700 -  autobrake set, flaps 30, spoilers deployed, reverse thrust engaged (Marcela, GFDL 1.2 www.gnu.org/licenses/old-licenses/fdl-1.2.html, via Wikimedia Commons)

The autobrake, the components which are located on center panel of the Main Instrument Panel (MIP), is designed as a deceleration aid to slow an aircraft on landing.  The system uses pressure, generated from the hydraulic system B, to provide deceleration for pre-selected deceleration rates and for rejected takeoff (RTO). An earlier post discussed Rejected Takeoff procedures.  This article will discuss the autobrake system.

General

The autobrake selector knob (rotary switch) has four settings: RTO (rejected takeoff), 1, 2, 3 and MAX (maximum).  Settings 1, 2 and 3 and RTO can be armed by turning the selector; but, MAX can only be set by simultaneously pulling the selector knob outwards and turning to the right; this is a safety feature to eliminate the chance that the selector is set to MAX accidentally.  

When the selector knob is turned, the system will do an automatic self-test.  If the test is not successful and a problem is encountered, the auto brake disarm light will illuminate amber.

The autobrake can be disengaged by turning it to OFF, by activating the toe brakes, or by advancing the throttles; which deactivation method used depends upon the circumstances and pilot discretion.  Furthermore, the deceleration level can be changed prior to, or after touchdown by moving the autobrake selector knob to any setting other than OFF.  During the landing, the pressure applied to the brakes will alter depending upon other controls employed to assist in deceleration, such as thrust reversers and spoilers.

The numerals 1, 2, 3 and MAX provide an indication to the severity of braking that will be applied when the aircraft lands (assuming the autobrake is set).

In general, setting 1 and 2 are the norm with 3 being used for wet runways or very short runways.  MAX is very rarely used and when activated the braking potential is similar to that of a rejected take off; passenger comfort is jeopardized and it is common for passenger items sitting on the cabin floor to move forward during a MAX braking operation.  If a runway is very long and environmental conditions good, then a pilot may decide to not use autobrakes favouring manual braking.

Often, but not always, the airline will have a policy to what level of braking can or cannot be used; this is to either minimize aircraft wear and tear and/or to facilitate passenger comfort. 

The pressure in PSI applied to the autobrake and the applicable deceleration is as follows:

  • Autobrake setting 1 - 1250 PSI equates to 4 ft per second squared.

  • Autobrake setting 2 - 1500 PSI equates to 5 ft per second squared.

  • Autobrake setting 3 - 2000 PSI equates to 7.2 ft per second squared.

  • Autobrake setting MAX and RTO - 3000 PSI equates to 14 ft per second (above 80 knots) and 12 ft per second squared (below 80 knots).

Conditions

To autobrake will engage upon landing, when the following conditions are met:

  • The appropriate setting on the auto brake selector knob (1, 2, 3 or MAX) is set;

  • The throttle thrust levers are in the idle position immediately prior to touchdown; and,  

  • The main wheels spin-up.

If the autobrake has not been selected before landing, it can still be engaged after touchdown, providing the aircraft has not decelerated below 60 knots. Setting the autobrake usually forms part of the approach cehcklist.

To disengage the autobrake system, any one of the following conditions must be met:

  1. The autobrake selector knob is turned to OFF (autobrake disarm annunciator will not illuminate);

  2. The speed brake lever is moved to the down detent position;

  3. The thrust levers are advanced from idle to forward thrust (except during the first 3 seconds of landing); or,

  4. Either pilot applies manual braking.

The last three points (2, 3 and 4) will cause the autobrake disarm annunciator to illuminate for 2 seconds before extinguishing.

Important Facet

It is important to grasp that the 737 NG does not use the maximum braking power for a particular setting (maximum pressure), but rather the maximum programmed deceleration rate (predetermined deceleration rate).  Maximum pressure can only be achieved by fully depressing the brake pedals or during an RTO operation.  Therefore, each setting (other than full manual braking and RTO) will produce a predetermined deceleration rate, independent of aircraft weight, runway length, type, slope and environmental conditions.

Autobrake Disarm Annunciator

The autobrake disarm annunciator is coloured amber and illuminates momentarily when the following conditions are met:

  • Self-test when RTO is selected on the ground;

  • A malfunction of the system (annunciator remains illuminated - takeoff prohibited);

  • Disarming the system by manual braking;

  • Disarming the system by moving the speed brake lever from the UP position to the DOWN detente position; and,

  • If a landing is made with the selector knob set to RTO (not cycled through off after takeoff).  (If this occurs, the autobrakes are not armed and will not engage.  The autobrake annunciator remains illuminated amber).

The annunciator will extinguish in the following conditions:

  • Autobrake logic is satisfied and autobrakes are in armed mode; and,

  • Thrust levers are advanced after the aircraft has landed, or during an RTO operation.  (There is a 3 second delay before the annunciator extinguishes after the aircraft has landed).

Preferences for Use of Autobrakes and Anti-skid

When conditions are less than ideal (shorter and wet runways, crosswinds), many flight crews prefer to use the autobrake rather than use manual braking, and devote their attention to the use of rudder for directional control.   As one B737 pilot stated - ‘The machine does the braking and I maintain directional control’.

Anti-skid automatically activates during all autobraking operations and is designed to give maximum efficiency to the brakes, preventing brakes from stopping the rotation of the wheel, thereby ensuring maximum braking efficiency.  Anti-skid operates in a similar fashion to the braking on a modern automobile.

Anti-skid is not simulated in FSX/FS10 or in ProSim737 (at the time of writing).

To read about converting an OEM Autobrake.

Rejected Takeoff (RTO) - Review and Procedures

The Rejected Takeoff is part of the Auto Brake Selector Panel located on the Main Instrument Panel (MIP).  RTO can be selected by turning the selector knob to the left from OFF by one click. The knob is from a classic 737-500 knob

A takeoff may be rejected for a variety of reasons, including engine failure, activation of the takeoff warning horn, ATC direction, blown tyres, or system warnings.  For whatever reason, Boeing estimates that 1 takeoff in every 2000 will be rejected (Boeing Corporation).

This is an OEM (Original Equipment Manufacture) autobrake assembly that has been converted for use in the simulator.  Note that the selector knob is not NG compliant but is from a 500 series airframe.  In time this knob will be replaced.  (click image to enlarge)

Performed incorrectly, an RTO can be a dangerous procedure; therefore, protocols have been are established that need to be followed.  

This is the first of two consecutive posts that will discuss components of the autobrake system.  In this post RTO procedures will be explained.  In the second post the auto brake will be examined.

Rejected Takeoff (RTO)

The Auto Brake and Rejected Takeoff (RTO) are part of Auto Brake System, the components which are located on center panel of the Main Instrument Panel (MIP).  An RTO is when the pilot in command makes the decision to reject the takeoff of the aircraft.  

The Boeing Flight Crew Training Manual (FCTM) states:

  • A flight crew should be able to accelerate the aircraft, have an engine failure, abort the takeoff, and stop the aircraft on the remaining runway'; or,

  • 'accelerate the aircraft, have an engine failure, and be able to continue the takeoff utilizing one engine’.  

Two important variables of pre-flight planning need to be established for an RTO to be executed safely - V speeds and runway length.

V Speeds and Runway Length

There are three V speeds that are critical to a safe takeoff and climb out: V1, Vr and V2.  

V1 is the speed used to make the decision to ‘abort or fly’.  Vr is the rotation speed, or the speed used to begin the rotation of the aircraft by smoothly pitching the aircraft to takeoff attitude.  V2 is the speed used for the initial climb-out, and is commonly called the takeoff safety speed.  The takeoff safety speed ensures a safe envelope for single engine operations.

It stands to reason, that the runway must be long enough to cater towards the V speeds calculated from the weight of the aircraft and outside temperature.

Rejected Takeoff - Conditions and Procedure

In general, the protocol used to execute an RTO, is to:

  • Abort the takeoff for ‘cautions’ below 80 knots; and,

  • Between 80 knots and V1 speed, abort only for ‘bells’ (fire warning) and flight control problems.

If a problem occurs below V1 speed, the aircraft should be able to be stopped before reaching the end of the runway.  After exceeding V1 speed, the aircraft cannot be safely stopped and the only option is to takeoff, and after reaching a safe minimum altitude and speed, troubleshoot the problem.

Before takeoff, a flight crew will position the auto brake selector knob to RTO.  This action will trigger the illumination of the auto brake disarm annunciator, which will illuminate amber for 2 seconds; this is a self-test to indicate that the system is working.  After 2 seconds the annunciator will extinguish.

To arm the RTO prior to takeoff, the following conditions must be met:

  • The auto brake and anti-skid systems must be operational;

  • The aircraft must be on the ground;

  • The auto brake selector must be set to RTO;

  • The forward thrust levers must be in the idle position; and

  • The wheel speed must be less than 60 knots.

Once armed, the RTO system only becomes operative after the aircraft reaches 80 knots ground speed (some manuals state 90 knots).  If an ‘abort’ is indicated below 80 knots, the aircraft will need to be stopped using manual braking power.  

The auto brake will remain in the armed mode if the RTO abort was executed prior to 80 knots (the auto brake disarm annunciator does not illuminate).

To engage the RTO the following conditions must be met:

  • The auto brake must be set to RTO;

  • The thrust levers must be retarded to idle position;

  • The aircraft must have reached 80 knots; and,

  • The autothrottle must be disconnected.

When an RTO is executed and the auto brake system engages, the system will apply 3000 PSI to the brakes to enable the aircraft to stop.  Additionally, if the aircraft has reached a wheel speed in excess of 60 knots, and one or two of the reverse thrust levers are engaged, the spoiler panels will extend automatically to the UP position (deploy), and the speed brake lever on the throttle quadrant will move to the UP position.

The auto brake will disengage, if during the RTO either pilot:

  • Activates the toe brakes;

  • Turns the selector knob of the auto brake from RTO to off.   

If the reversers have been engaged and the speed brake lever is in the UP position, then the lever will abruptly move to the DOWN detente position.  When this occurs, the speed brake annunciator will illuminate amber for 2 seconds before extinguishing.  Braking will then need to be accomplished manually.

RTO Procedure

  1. Pilot flying calls ‘STOP’, ‘ABANDON’ or ‘ABORT’

  2. Pilot flying closes thrust levers and disengages autothrottle.

  3. Pilot flying verifies automatic RTO braking is occurring, or initiates manual braking if deceleration is not great enough, or autobrake disarm light is illuminated.

  4. Pilot flying raises speedbrake lever.

  5. Pilot flying applies maximum reverse thrust or thrust consistent with runway and environmental conditions.

  6. Once stopped, pilot flying engages parking brake and completes RTO checklist.

Important Point:

  • Point 4 is important as although the spoilers deploy automatically when the reverse thrust is engaged, the speedbrake lever must be extended manually by the pilot flying (prior to application of reverse thrust).  This is to minimise any delay in spoiler extension, as extension is necessary for efficient wheel braking.

What Circumstances Trigger An RTO

Prior to 80 knots, the takeoff should be rejected for any of the following:

  • Activation of the master caution system;

  • Unusual noise and vibration;

  • Slow acceleration;

  • Takeoff configuration warning;

  • Tyre failure;

  • Fire warning;

  • Engine failure;

  • Bird strikes;

  • Windshear warning;

  • Window failure; and/or,

  • If the aircraft is unsafe or unable to fly.

After 80 knots and prior to V1, the takeoff should be rejected for any of the following:

  • Fire warning;

  • Engine failure;

  • Windshear warning; and/or,

  • If the aircraft is unsafe or unable to fly.

After V1 has been reached, takeoff is mandatory.

Important Points:

Important points to remember when performing a Rejected Takeoff are:

  1. Engage the RTO selector knob before takeoff;

  2. Retard throttles to idle;

  3. Disengage the autothrottle (A/T);

  4. Engage one or both reverse thrust levers;

  5. Monitor RTO system performance, being prepared to apply manual braking if the auto brake disarm light annunciates;

  6. Manually raise speed brake lever if not already in the UP position BEFORE engaging reverse thrust; and,

  7. Remember that RTO functionality engages only after the aircraft has reached 80 knots ground speed, and remains armed if the RTO has been executed below 80 knots.

Procedural Variations

A successful RTO is dependent upon the pilot flying making timely decisions and using proper procedures.  Whether an RTO is executed fully or partly is at the discretion of the pilot flying (reverse thrust engaged to deploy spoilers).

It should be noted that If the takeoff is rejected before the THR HLD annunciation, the autothrottles should be disengaged as the thrust levers are moved to idle. If the autothrottle is not disengaged, the thrust levers will advance to the selected takeoff thrust position when released. After THR HLD is annunciated, the thrust levers, when retarded, remain in idle.

For procedural consistency, disengage the autothrottles for all rejected takeoffs.

Figure 1 provides a visual reference indicating the distance taken for an aircraft to stop after various variations of the Rejected Takeoff are executed (copyright, Boeing Flight Crew Training Manual FCTM).

figure 1: distance taken for an aircraft to stop after various variations of the Rejected Takeoff are executed (copyright, Boeing Flight Crew Training Manual FCTM)

This post has explained the basics of a Rejected Takeoff.  Further information can be found in the Flight Crew Training Manual (FCTM) or Quick Reference Handbook (QRH).

In the next post the autobrake system will be discussed.

Direct-To-Routing, ABEAM PTS and INTC CRS - Review and Procedures

In an earlier post, a number of methods were discussed in which to create waypoints ‘on the fly’ using the Control Display Unit (CDU).  Following on a similar theme, this post will demonstrate use of the Direct-To Routing, ABEAM PTS and Course Intercept (INTC CRS) functionality.

CDU use an appear very convoluted to new users, and by far the easiest way to understand the various functionalities is by ‘trial and error and experimentation’. 

The software (Sim Avionics and ProSim737) that generates the math and formulas behind the CDU is very robust and entering incorrect data will not damage the CDU hardware or corrupt the software.  The worst that can happen is having to restart the CDU software. 

Line Style and Colour

The style and colour of the line displayed on the Navigation Display (ND) is important as it provides a visual reference to the status of a route or alteration of a route.

Dashed white-coloured lines are projected courses whilst solid magenta-coloured lines are saved and executed routes.  Similar colour schemes apply to the waypoints in the LEGS page.  A magenta-coloured identifier indicates that this is the next waypoint that the aircraft will be flying to (it is the active waypoint).

Direct-To Routing

A Direct-To Routing is easily accomplished, by selection of a waypoint from the route in the LEGS page, or by typing into the scratchpad (SP) a NAVAID identifier and up-selecting this to LSK 1L.  Once up-selected, the Direct-To route will be represented on the Navigation Display (ND) by a dashed white-coloured line.  Pressing the EXEC button on the CDU will accept the route modification and precipitate several changes:

  • The route line displayed on the ND, previously a white-coloured dashed line will become solid magenta in colour;

  • The previous displayed route will disappear from the ND;

  • All waypoints on the LEGS page between the aircraft's current position and the Direct-To waypoint in LSK 1L will be deleted; and,

  • The Direct-To waypoint in LSK 1L will alter from white to magenta.

Once executed the FMS will direct the aircraft to fly directly towards the Direct-To waypoint.

ABEAM PTS

Following on from the Direct-To function is the ABEAM PTS function located at LSK 5R. 

ABEAM points (ABEAM PTS) are one or more fixes that are generated between two waypoints from within a programmed route.  The ABEAM PTS functionality is found in the LEGS page of the CDU at LSL 5R and is only visible when a Direct-To Routing is being modified, within a programmed route (the LEGS page defaults to MOD RTE LEGS).  Furthermore, the ABEAM PTS dialogue will only be displayed if the the up-selected fix/waypoint is forward of the aircraft's position; it will not be displayed if the points are located behind the the aircraft.

If the ABEAM PTS key is depressed, a number of additional in-between fixes will be automatically generated by the Flight Management System (FMS), and strategically positioned between the aircraft’s current position and the waypoint up-selected to LSK 1L.  The generated fixes and a white-coloured dashed line showing the modified course will be displayed on the Navigation Display (ND).  

To execute the route modification, the illuminated EXEC button is pressed.  Following execution, the white-coloured line on the ND will change to a solid magenta-coloured line, and the original displayed route will be deleted.  Furthermore, the LEGS page will be updated to reflect the new route.

Nomenclature of Generated Fixes

The naming sequence for the generated fixes is the first three letters of the original waypoint name followed by two numbers (for example, TTR will become TTR 01 and CLARK will become CLA01).  If the fixes are regenerated, for instance if a mistake was made, the sequence number will change indicating the next number (for example, TTR01, TTR02, etc).  

Technique

  1. Up-select a waypoint from the route in the LEGS page to LSK 1L, or type into the scratchpad a NAVAID identifier.  This is a Direct-To Routing; when executed the waypoints between the up-selected waypoint and LSL 1L are deleted.

  2. Press ABEAM PTS in LSK 5R to generate a series of fixes along a defined course from the aircraft’s current location to the up-selected waypoint.  The fixes can be seen on the ND.

  3. Pressing the EXEC button will accept and execute the ABEAM PTS route.

Example and Figures

The below figures are screen captures using ProSim737 avionics suite.  The programming of the CDU has been done with the aircraft on the ground.  Click any image to enlarge.

FIGURE 1:  The LEGS page shows a route HB-TTR-CLARK-BABEL-DPO-WON.  The route is defined by a solid magenta-coloured line

FIGURE 2:  The Route is altered to fly from HB to BABEL.  Note that in the LEGS page, the title has changed from ACT to MOD RTE 1 LEGS.  The ND displays the generated ABEAM PTS and projected course (white-coloured dashed line), beginning from the aircraft’s current position and traveling through HB01, TTR01, CLA01 to BABEL.   The EXEC light is also illuminated

FIGURE 3:  When the EXEC light is pressed, the ABEAM PTS and altered route (Figure 2) will be accepted.  The former route will be deleted and the white-coloured dashed line will be replaced by a solid magenta-coloured line.  The magenta colour indicates that the route has been executed.  The LEGS page will also be updated and display the new route, with the waypoint HB01 highlighted in magenta

The Intercept Course (INTC CRS)

To understand the INTC CRS, it is important to have a grasp to what a radial and bearing is and how they differ from each other.  For all practical purposes, all you need to know is that a bearing is TO and a radial is FROM.  For example, if the bearing TO the beacon is 090, you are on the 270 radial FROM it. 

The Intercept Course (INTC CRS) function is located beneath the ABEAM PTS option in the LEGS page of the CDU at LSK 6R.  Like the ABEAM PTS function, the INTC CRS function is only visible when a when a Direct-To Routing, is being modified within a programmed route (the LEGS page defaults to MOD RTE LEGS).

The function is used when there is a requirement to fly a specific course (radial) to the fix/waypoint.  By default, the INTC CRC displays the current course to the fix/waypoint.  Altering this figure, will instruct the FMS to calculate a new course, to intercept the desired radial towards the fix/waypoint (1)  The radial will be displayed on the ND as a white-coloured dashed line, while the course to intercept the radial (from the aircraft’s current position) will be displayed as a magenta-coloured dashed line.

Visual Cues

An important point to note is that,  if the course (CRS) is altered, is that the displayed (ND) white-coloured line will pass directly through the fix/waypoint, but the line-style will be displayed differently dependent upon what side of the fix/waypoint the radial is, in relation to the position of the aircraft.  The line depicted by sequential long and short dashes (dash-dot-dash) shows the radial TOWARDS the fix/waypoint while the line showing dots, displays the radial AWAY from the fix/waypoint. 

It is important to understand, that for the purposes of the FMS, it will always intercept a course TO a fix/waypoint; therefore, the disparity in how the line-style is represented provides a visual cue to ensure a flight crew does not enter an incorrect CRS direction.

Intercept Heading

However, the flight crew may wish not fly directly to the fix/waypoint, but fly a heading to intercept the radial.  In this case, the flight crew should select the particular heading they wish to fly in the MCP heading selector window, and providing LNAV is armed, the aircraft will fly this heading until reaching the intercept course (radial), at which time the LNAV will engage and the FMS will direct the aircraft to track the inbound intercept course (radial) to the desired fix/waypoint.

Technique

  1. Up-select a waypoint from the route in the LEGS page to LSK 1L, or type into the scratchpad a NAVAID identifier and up-select.  This is a Direct-To Routing and will delete all waypoints that the aircraft would have flown to prior to the up-selected identifier.

  2. Type the course required into INTC CRS at LSK 6R.

  3. This will display on the ND a white-coloured long dashed line (course/radial).  Check the line-style and ensure that the course is TOWARDS the waypoint.  The line, closest to the aircraft should display sequential long and short dashes.

  4. Prior to pressing the EXEC button to confirm the route change, check that the intended course line crosses the current course line of the active route (solid magenta-coloured line).

  5. If wishing to fly a heading to intercept the radial, use the MCP heading window.  If LNAV is armed the FMS will direct the aircraft onto the radial.

Example and Figures

The below figures are screen captures using ProSim737 avionics suite.  The programming of the CDU has been done with the aircraft on the ground.  Click any image to enlarge.

FIGURE 1:  The LEGS page shows a route HB-TTR-CLARK-BABEL-DPO-WYY-WON.  The route is defined by a solid magenta-coloured line.   ATC request ‘QANTAS 29 fly 300 degrees until intercepting the 345 degree radial of BABEL; fly that radial to BABEL then remainder of route as filed

FIGURE 2:  From the LEGS page, locate in the route the waypoint BABEL (LSK 4L).  Recall that the INTC CRS will only function in Direct-To Routing mode. Up-select BABEL to LSK 1L.  Note that a dashed white-coloured line is displayed on the ND showing the new course from HB to BABEL.  The original course is still coloured magenta and the EXEC light is illuminated

FIGURE 3:  Type the radial required (345) into INTC CRS at LSK 6R.  This action will generate (fire across the page) a white-coloured dashed line displaying the 345 course to BABEL (the 165 radial).  Check the line-style and ensure the radial crosses the aircraft’ current course which is 300.  Recall that this line style indicates that the radial to TO BABEL

FIGURE 4:   Press EXEC to save and execute the new route.  The dashed line alters to a solid magenta-coloured line and joins with the remainder of the route at BABEL.  The magenta colour indicates this is now the assigned route.  Note that the magenta line continues across the ND away from the aircraft and BABEL.  This is another visual cue that the radial is traveling TO BABEL

If the aircraft continues to fly on a course of 300 Degrees, and LNAV is armed, the FMS will alter course at the intersection and track the 345 course to BABEL (165 radial).  The LEGS page is also updated to reflect that BABEL is the next waypoint to be flown to (BABEL is coloured magenta

Final Call

Direct-To Routings and ABEAM Points are usually used when a flight crew is required to deviate, modify or shorten a route.  Although the use of ABEAM PTS can be debated for short distances, the technology shines when longer routes are selected and several fixes are generated. The Intercept Course function, on the other hand, is used whenever published route procedures (STAR and SID transitions), or ATC require a specific course (radial) or heading to be followed to or from a navigation fix.

Caveat

The content of this post has been checked to ensure accuracy; however, as with anything that is convoluted minor mistakes can creep in (Murphy, aka Murphy's Law, reads this website).  If you note a mistake, please contact me so it can be rectified.

Acronyms and Glossary

  • ATC – Air Traffic Control

  • CDU – Control Display Unit

  • Direct-To Routing – Flying directly to a fix/waypoint that is up-selected to LSK 1L in the CDU.  All waypoints prior to the u-selected waypoint will be deleted

  • DISCO – refers to a discontinuity between two waypoints loaded in a route within the LEGS page of the CDU.  The DISCO needs to be closed before the route can be executed

  • DOWN-SELECT - Means to download from the CDU LEGS page to the scratchpad of the CDU)

  • FIX – A geographical position determined by visual reference to the surface, by reference to one or more NAVAIDs

  • FMC – Flight Management Computer

  • FMS – Flight Management System

  • Identifiers – Identifiers are in the navigation database and are VORs, NDB,s and published waypoints and fixes

  • LSK 5L – Line Select: LSK refers to line select.  The number 5 refers to the sequence number between 1 and 6.  L is left and R is right (as you look down on the CDU in plan view)

  • MCP – Mode Control Panel

  • NAVAIDS – Any marker that aids in navigation (VOR, NDB, Waypoint, Fix, etc.).  A NAVAID database consists of identifiers which refer to points published on routes, etc

  • ND – Navigation Display

  • RADIALS – A line that transects through a NAVAID representing the points of a compass.  For example, the 045 radial is always to the right of your location in a north easterly direction (Bearings and Radials Paper)

  • ROUTE – A route comprising a number of navigation identifiers (fixes/waypoints) that has been entered into the CDU and can be viewed in the LEGS page

  • SP - Scratchpad

  • UP-SELECT – Means to upload from the scratchpad of the CDU to the appropriate Line Select (LSK)

  • WAYPOINT – A predetermined geographical position used for route/instrument approach definition, progress reports, published routes, etc.  The position is defined relative to a station or in terms of latitude and longitude coordinates.

1:  The FMS will calculate the new course based on great circle course between the aircraft’s current location and the closest point of intercept to the desired course.  This course is displayed on the ND as a white dashed line.

Integrated Approach Navigation (IAN) - Review and Procedures

Japanese airlines nearly always gravitate to new technology.  ANA landing RJAA (Narita, Japan). Maarten Visser from Capelle aan den IJssel, Nederland, JA02AN B737 ANA gold cs landing (7211516992), CC BY-SA 2.0

Increased navigational accuracy obtained from software and hardware improvements have led to several enhanced approach types being developed for the Boeing 737.  These augmented approach types provide a constant rate of descent, follow an approximate 3 degree glide path, and eliminate the traditional step-down style of approach.   

This improves landing capability in adverse weather conditions, in areas of difficult terrain, and on existing difficult to fly approach paths.  Not to mention, the benefits that a stabilized and safer approach bring: greater passenger comfort, less engine wear and tear, and lower fuel usage while bringing less workload for the flight crew. 

In this article, I will discuss the concept of Integrated Approach Navigation (IAN) and explain the procedures recommended by Boeing to successfully implement IAN. 

The Boeing Flight Crew Training Manual (FCTM) has an excellent section addressing IAN, and I recommend you read it to gain a greater understanding of how the IAN system functions.

The Navigation Performance Scales (NPS), which augment IAN, will not be discussed.  NPS will form part of a future article.  Information in this article relates to FMC software U10.8A.

Overview

Integrated Approach Navigation (IAN) derives information from an approach type selected from the Flight Management Computer (FMC) database to generate a 3 degree glide path from the Final Approach Fix to the threshold of the runway.  In so doing, it displays visual cues similar to the Instrument Landing System (ILS).  Flight path guidance is derived from the FMC, navigational radios, or combination of both. 

To use IAN, an approach with a glide path must be selected from the FMC database.  The approach must include a series of waypoints that depict a vertical profile that includes a glide path.  

An IAN approach may be flown with a single autopilot, raw data, or by following the visual cues displayed on the Flight Director (FD).

IAN is an airline option, and although not every airline carrier will have IAN as part of their avionics suite, the technology is becoming more popular as the safety and economic benefits of IAN are understood by airline carriers.

Geometric Path (Glide Path)

An IAN Approach approximates a 3 degree glide path (descent profile) from the Final Approach Fix (FAF) to approximately 50 feet above the runway threshold.  Although, the glide path may not comply with altitude constraints in the FMC prior to the FAF, the generated glide path will always be at or above the altitude constraints between the FAF and the Missed Approach Point (MAP) displayed in the FMC.

Critically, an IAN approach is a Category I Non Precision Approach (NPA) and is not to be confused with an ILS Precision Approach.  Therefore, NPA procedures must be adhered to when initiating an approach using IAN.  

Although the automation provided by IAN will guide an aircraft (in most cases) to the threshold of the runway, IAN has not been designed to do this.  Rather, IAN has been designed to guide the aircraft to the MAP published on the approach chart.  The flight crew will then disengage IAN by disengaging the autopilot and autothrottle and fly the remainder of the approach manually as per NPA protocols.

In some instances, the final approach course (FAC) is offset from the runway center line and manoeuvring the aircraft for direct alignment will be necessary, whilst following the glide path angle.

Although the final approach is very similar to an ILS approach, IAN does not support autoland; if the aircraft is not in a stable configuration and you are not visual with the runway at or beyond the MDA, a missed approach procedure (Go-Around) should be executed.

Consistency in Procedures (eighteen approach types to one)

The introduction of IAN has condensed the number of approach types (and differing procedures) to one consistent procedure; minimising the amount of time an airline needs to train pilots in numerous approach types.  Time is money and utilising advanced technology such as IAN can increase airline productivity and safety.

Approach Types

IAN can be used for the following approach types:

  • RNAV

  • RNAV (RNP) – (provided there are no radius to fix legs)

  • NDB and VOR

  • GPS & GNSS

  • LOC, LOC-BC, TACAN, LDA SDF (or similar style approaches)

Note that if using IAN to execute a Back Course Localiser approach (B/C LOC), the inbound front course must be set in the MCP course window.

During the approach you must monitor raw data and cross check against other navigational cues.  Furthermore, although the use of IAN is recommended only for straight-in approaches, line use suggests that flight crews routinely engage IAN up to, but not exceeding 45 degrees from the runway approach course.

IAN is compatible with several approach types, however, being compatible does not necessarily mean that every approach type in the FMC is suitable. 

Since IAN was introduced, additional approaches have been developed and added to the RNAV family; in particular, RNAV (RNP) approaches, that use ‘radius to fix’ (RF) to generate a curved path that terminates at a location where an approach procedure begins.   These approaches have been designed to optimise airspace and usually have tight separation requirements; to fly these approaches an aircraft is required to have additional on-board navigation performance monitoring and alerting equipment. 

These approach charts are identified by the title RNAV (RNP) RWY XX and the letters AR (Authorisation Required) in the description of the chart. 

These approaches and are not suitable to use with IAN; they should be flown with LNAV/VNAV.

Recommended Approach Types

The best approach to use with IAN are straight-in or near straight-in approaches.  VOR, LOC, NDB, RNAV and RNAV (GNSS) approaches work especially well as these approaches usually provide relatively long straight-in legs. 

IAN can be used on an RNP (AR) approaches as long as there are no RF turns involved (straight-in approach only).  If flying such an approach you should be aware that the legs can be quite short and IAN may arm and engage quite late in the approach profile.

Important Point:

  •    The use of IAN is not authorised for a RNAV (RNP-AR) approach.

Using IAN – General

IAN does not need to be specifically ‘turned on’ for it to function; the functionality, if installed in the aircraft, is always operational.  When the aircraft is within range of the designated approach, the runway data and/or Deviation Pointers will annunciate and be displayed on the PFD.  At any time after this point has been reached, IAN can be armed and or engaged by pressing the APP button on the MCP.

Navigation Radios and Radio Frequencies

For an IAN approach to function, an approach procedure with a glide path must be selected from the FMC database.  Although selection of navigation radios is not mandatory, selection is recommended, as correct tuning of the radios can provide increased visual awareness and redundancy, should a CDU failure occur, or there be a corruption of the data in the FMC. 

Boeing strongly advise to tune the radios to the correct localiser frequency for the approach.  This eliminates the possibility of the radio picking-up another approach from a nearby airport (and providing erroneous data to the crew).  The ILS frequency must never be used with an IAN approach (unless the glideslope is inoperative).  In the case of an inoperative glideslope, the G/S prompt in the CDU must be selected to OFF to ensure that the FMC generated glide path is flown. 

Minimum Descent Altitude (MDA)

As mentioned, an IAN approach is a NPA, and when authorised by the Regulatory Authority non-ILS approaches can be flown to a published VNAV Decision Altitude/Height (DA/H) or to a published MDA (the MDA is used as a decision altitude).  If not authorised to use the MDA as a decision altitude, crews must use the MDA specified for the approach flown.

To comply with the MDA protocols during a constant angle approach where a level off is not planned at the MDA, it is necessary to add +50 feet to the published MDA.  This enables an adequate buffer to prevent incursion below the MDA and adhere to the NPA protocols.

Important Points:

  • IAN uses the FMC database to generate a 3 degree glide path from the FAF to the runway threshold.  IAN does not require the navigation radios to be tuned.  However, it is recommended to tune the radios.

  • Some approaches in the FMC database have a number of glide paths displayed with differing altitudes.  When presented with this scenario, always select the first glide path and altitude.

IAN approach to RJAA ILS X or LOC X Rwy 16L.  The localiser has been captured and the FMA displays FAC in green, while G/P is armed (FMA G/P white).  The vertical Deviation Pointer is displayed as an outlined magenta-coloured diamond (anticipation pointer) while the localiser is displayed as solid magenta (because FAC has been captured).  The source of the runway data is from the FMC (ProSim737 avionics suite)

Using IAN - IAN Annunciations and Displays

IAN can display several visual cues to alert you to the status of the IAN system.  The cues are triggered at various flight phases and are displayed on the attitude display of the Primary Flight Display (PFD) and on the Flight Mode Annunciator (FMA).

Runway Data:   Runway data (runway identifier, approach front course, approach type and distance to threshold) is displayed in the top left area on the PFD when either the localiser or the selected FMC approach is in range of the runway. 

IAN approach to RJAA ILS X or LOC X Rwy 16L.  The localiser and glide path have been captured.  The FMA displays FAC and G/P in green and SINGLE CH is displayed.  The Deviation Pointers, previously in outline (Figure above), are now solid filled.  The aircraft will descent on the glide path to the threshold of the runway (ProSim737 avionics suite)

If the source of the runway data is the navigation radio, then this information will be displayed when the radio is in range of the localiser.  However, if the primary data source is from the FMC (radio not tuned) the runway data will be displayed only after IAN has engaged.   When IAN engages, the runway data will be sourced from the FMC.  This will be evident as the  approach type will be displayed on the PFD.

The approach type (LNAV, FMC, LOC, ILS etc) displayed will depend on what type of approach has been selected from the FMC database. 

Approach Guidance:  Approach guidance (Deviation Pointers) are displayed on the PFD whenever IAN is in range of the runway.  When the Deviation Pointers are displayed, IAN can be used.

Final Approach Course (FAC):  The letters FAC are displayed on the center FMA when IAN is armed.

It stands to reason, that FAC (lateral guidance) usually annunciates prior to G/P (vertical guidance), but depending on the position of the aircraft when APP in pressed, both annunciations may be displayed at the same time.

Glide Path (G/P):  The letters G/P are displayed on the right FMA when IAN is armed.

FMA FAC and G/P Colours:  Two FMA colours are used.  White indicates that the FAC or G/P is armed.  The colour of the FMA display will change from white to green when the aircraft captures either the localiser or glide path. 

Mode Control Panel (MCP):  Arming IAN (pressing the APP button on the MCP) will cause the letters APP on the MCP to be illuminated in green.  The APP light will extinguish when IAN captures the glide path.  

Lateral and Vertical Guidance Deviation Pointers:  Deviation Pointers display the lateral and vertical position of the aircraft relative to the final approach course of the selected runway.  The lateral pointer represents the localiser while the vertical pointer represents the glide path.  The pointers are displayed whenever IAN is in range of the runway. 

The pointers will initially be displayed as either magenta or white-coloured outlined diamonds.  When the aircraft captures either the localiser or glide path, (2 1/2 dots from center) the pointer (s) will change from an outline, to a solid-filed magenta-coloured diamond.

Whether the initial colour of the diamonds is magenta or white depends on which pitch/roll mode has been selected when the aircraft comes into range.

Although the correct name for the pointers is Deviation Pointers, they are often called anticipation pointers, anticipation cues or ghost pointers (ghost pointers being an 'Americanism').

During an IAN approach:

  1. The deviation alerting system will self-test when passing through 1500 feet radio altitude.  The self-test will generate a two-second FAC deviation alerting display on each PFD (the pointers will flash in amber); and,

  2. If the autopilot is engaged, and at low radio altitudes, the scale and Deviation Pointers will turn amber and begin to flash if the deviation from either the localiser or glide path is excessive.

SINGLE CH:  SINGLE CH will be displayed in green, when the aircraft captures the glide path (both the localiser and glide path). At this time, the Deviation Pointers will change from white-coloured outlines to solid magenta-coloured diamonds.  FAC and G/P on the FMA will also be in green.  Additionally, the illuminated APP button on the MCP will extinguish.  At this point, the aircraft will be guided automatically along the glide path.

Flight Mode Annunciations (FMA):  The FMA display will vary depending on the source of the navigation guidance used for the approach.

For localiser-based approaches (LOC, LDS, SDF and ILS (glideslope OUT), the FMA will display VOR/LOC and G/P.  For B/C LOC approaches, the FMA will display B/CRS and G/P.

If lateral course guidance is derived from the FMC (RNAV, GPS, VOR, NDB and TACAN approaches), the FMA will display FAC and G/P.

Ground Proximity Warning System (GWPS) Aural Warnings and Displays:  GWPS warnings will annunciate if at any time the aircraft deviates below the glide path, and failure to disengage IAN at the appropriate altitude will trigger a GPWS aural warning alert ‘autopilot autopilot’ at 100 feet radio altitude.  This is in addition, to the words ‘autopilot’ being displayed on the PFD.

Using IAN – At What Distance Does IAN Work

IAN is not designed to navigate to the airport and its functionality will only be available when the  aircraft is in range of the airport runway; for a straight-in approach, this is at approximately 20 nautical miles.  However, this distance can be considerably less if the aircraft is not on a straight-in course to the runway. 

Important Point:

  • To give you the longest time from which to transition to an IAN approach, try to choose a suitable approach type (from the FMC) that exhibits a ‘more or less’ straight-in approach.

Using IAN – When to Arm and Engage IAN

  1. IAN can be armed at anytime after the Deviation Pointers are displayed on the PFD.  

  2. To arm/select IAN, the flight crew press the APP button on the Mode Control Panel (MCP) similar to performing an ILS approach.

  3. IAN is armed only after clearance for final approach has been received from Air Traffic Control (ATC).  By this time, the aircraft is probably on a straight-in approach.

  4. IAN cannot be used for STARS and is not designed to be engaged when the aircraft is ‘miles’ from the designated runway.  Transition to an IAN approach can be from any of several pitch/roll modes.

  5. IAN (if armed) engages automatically when the either the localiser or glide path is captured.

IAN should only be armed or engaged when:

  1. The guidance to be used for the final approach is tuned and identified on the navigation radio;

  2. An approach has been selected from the FMC database that has a 3 degree glide path;

  3. The appropriate runway heading is set in the course window in the MCP;

  4. The aircraft is on an inbound intercept heading;

  5. ATC clearance for the approach has been received; and,

  6. The approach guidance information is displayed on the PFD along with the lateral and vertical Deviation Pointers.

Disengaging IAN

IAN is either armed, engaged or not engaged. 

If you want to disarm IAN from the arm mode, it is a matter of pressing the APP button on the MCP; the light on the APP button will extinguish and the Deviation Pointers on the PFD will not be visible.

If you want to disengage IAN after it has captured either the localiser or glide path (or both), pressing the APP button on the MCP will do nothing.  In this scenario, to disengage IAN you will need to conduct a Go-Around by selecting TOGA, or change the pitch/roll mode (i.e. Level Change).

Disconnecting the autopilot and flying manually will also disengage IAN; the upside being that the Deviation Pointers will remain displayed on the PFD, until a different pitch/roll mode is selected.

Important Points:

  • If the navigation radio is not tuned to the localiser, the runway data will not be displayed until IAN is engaged, however, the Deviation Pointers will be displayed.

  • IAN can be armed whenever the aircraft is in range of the runway - in other words whenever the Deviation Pointers are displayed on the PFD.

  • When IAN is armed, the FAC and G/P display on the FMA is coloured white.

  • When IAN is engaged (localiser or glide path) the FAC and G/P on the FMA is coloured green.

  • IAN will only engage after capture of either the lateral (FAC) or vertical glide path (G/P).

  • When IAN has captured the glide path, SINGLE CH will be displayed in green in the PFD.

Using IAN - Set-Up and Procedure

The following procedures used for an IAN approach are derived from ILS procedures and are consistent for all approach types. 

  • Select the appropriate approach to use from the FMC database.  Ensure that the selected approach has a glide path.  Do not alter any of the approach constraints. 

  • Set the altitude of the glide path (from the FMC) in the MCP altitude window.

  • Fly the aircraft in whatever pitch/roll mode to the Initial Approach Fix (IAF).  Remember straight-in approaches are best, although offsets between 25 and 45 degrees may be used but not recommended. 

  • Configure the navigation radios to the correct frequency based on the approach type you have selected from the FMC database.  Do not use an ILS frequency.

  • Set the barometric minimums to the altitude published on the approach chart.  Add 50 feet to avoid breaking NPA protocols.

  • Set the correct runway approach course in the MCP course window.

  • Do not select IAN (press the APP button) until the aircraft is in the correct position relative to the approach course. 

  • When approximately 2 miles from the FAF - GEAR DOWN, FLAPS 15, SPEED CHECK.

  • At glide path capture (FAF) – FLAPS 25/30 (landing flaps), SPEED CHECK.

  • At 300 Feet below glide path capture, reset the MCP altitude window to the missed approach altitude.  Failure to wait until the aircraft descends 300 feet will cause the ALT HOLD annunciation to display and the aircraft levelling off.

  • At minima – Disengage autopilot and autothrottle, manually align aircraft to the runway, and follow the Deviation Pointers and Flight Director (FD) cues to the runway threshold.   Maintain the glide path to the flare and do not descend below the displayed glide path. 

Although glide path guidance can be used as a reference once the aircraft descends below the MDA, the primary means of approach guidance is visual.  If not visual at the MDA, execute a Go-Around.  Remember, using IAN is a NPA.

Important Points:

  • When using IAN the aircraft should be configured approximately 2 nautical miles from the FAF (this is one of the fundamental differences between an IAN approach and an ILS approach).

  • Often, the runway may not be aligned with the FMC generated course.  The FCTM states; ‘If the final approach course is offset from the runway centreline, manoeuvring to align with the runway centreline is required.  When suitable visual reference is established, continue following the glide path angle while manoeuvring to align with the runway.

  • Flying an IAN approach is an NPA; it is important to fly visually after passing the MDA.

  • The approach mode (APP on center CTR knob) on the EFIS can be selected when using IAN.  This will display the IAN approach on the Navigation Display as if it is an ILS approach.

Transitioning to an IAN Approach

A flight crew will usually transition to an IAN approach 2 nautical miles prior to the Initial Approach Fix (IAF).  

At this distance from the runway there is not a lot of time to configure the aircraft for landing, and if IAN engages when the aircraft is either above or below the glide path, there is a possibility that the aircraft will abruptly and unexpectedly ascend or descend as the automation attempts to capture the glide path.   Therefore, you must be in diligent that the aircraft’s altitude roughly matches the position of the Deviation Pointers when close to the FAF.

Techniques to Transition Smoothly to an IAN Approach

There are several techniques that can be used to ensure a smooth transition to an IAN approach.

By far the easiest technique to ensure a seamless transition without any abrupt lateral or vertical deviation, is to position the aircraft ‘more or less’ within one dot deviation of the localiser or glide path (Deviation Pointers) prior to selecting IAN. 

In this way you can follow (‘fly’) the Deviation Pointers and engage IAN when the aircraft is more or less aligned with the position of the pointers (similar to how an ILS approach is carried out).

Another technique, is to fly the aircraft until ALT HOLD is displayed in the FMA (assuming that the altitude set in the altitude window in the MCP is approximately 2 nautical miles from the FAF).  Then select IAN.  This should enable the aircraft to smoothly capture the glide path when reaching the FAF.

Importantly, if transitioning to IAN from VNAV, it is prudent to engage SPD INTV to manually control MCP speed.


FIGURE 1:  Visual representation of an IAN approach and transition from roll mode. (Copyright Boeing FCTM).


Increased Spatial Awareness

Any approach can be busy and it is easy to forget something.  Therefore, it is wize to create a circle at 2 miles from the FAF that can be displayed on the Navigation Display (NP).

One way to accomplish this is by using the FIX page in the CDU. 

In the LEGS page copy to the scratchpad the FAF (click the line on which the FAF is located).   Open the FIX page and upload the FAF (from the scratchpad) to the FIX entry.  To create a dashed circle at 2 nautical miles from the FAF, enter /2 to Line Select Left 1.

Important Points:

  • Maintaining the correct approach speed and altitude is paramount to a successful IAN approach.  If the aircraft is travelling too fast, slowing down after IAN has engaged can be difficult.  Likewise, if the aircraft is too high and IAN engages, the vertical descent can be steep as the aircraft attempts to follow the FMC generated glide path.

  • You must be vigilant and anticipate actions and events before they occur.

Using IAN - Situations To Be Attentive Of

Automation can have its pitfalls and IAN is no different.  However, once potential shortcomings are known, it is straightforward to bypass them.  The most common mistake, especially with virtual pilots, is not following the correct procedure.

Possible 'surprises' associated with an IAN approach are:

1.   Failing to configure the aircraft prior to IAN engaging in FAC and G/P mode.

Unlike an ILS approach, where configuration for landing is initiated when the aircraft captures the glideslope (usually some distance from the runway) during an IAN approach configuration for landing is initiated approximately 2 nautical miles from the FAF.  

If you have not configured the aircraft for landing prior to the capture of the glide path, there may be insufficient time for you to complete recommended actions and checklists.   

If you believe this will occur, there is no reason why configuration cannot occur at an earlier stage.

2.   Forgetting to set the Missed Approach Altitude (MAA) in the MCP.

Failing to wait until the aircraft has descended 300 feet below the glide path capture altitude to reset the MCP altitude to the MAA.  Failure will cause the ALT HOLD annunciation to display and the aircraft leveling off.

3.   Approaching the runway while not on the correct intercept course.

IAN operates flawlessly with straight-in approaches and to a certain extent with approaches up to 45 degrees from the main approach course, however, IAN will not engage if you approach the assigned runway at 90 degrees.  Nor will IAN engage if you are attempting to fly a STAR.

4.   Forgetting to set the initial glide path altitude in the MCP (from the FMC).

A common mistake is not setting the glide path altitude (from the FMC) in the MCP window when configuring the aircraft for an IAN approach.

ProSim737 and IAN

Installing IAN to ProSim-AR Avionics Suite

IAN forms part of the avionics suite, however, for IAN to function it needs to be selected (turned on) in the ProSim-AR IOS (Instructor Operator Station).  The same is for the Navigation Scales (if required).

To turn on IAN, open IOS: Settings/Cockpit Setup Options/Options and place a tick in the appropriate box beside IAN.  A restart of the ProSim-AR main module may be required for the change to take effect.

IAN was introduced to the ProSim737 avionics suite in December 2014.   For the most part, the functionality is reliable and operates as it should (see note 1).

As at writing, known issues are as follows (this may change with Version 3 software updates):

  • ProSim737 does not display the IAN runway data immediately following the engagement of TO/GA during the take-off roll. 

This is incorrect.  In the real aircraft, this information is displayed immediately following the engagement of TO/GA during the take-off roll while.  (further research required)

  • The colour of the approach guidance display (LNAV/VNAV) after TO/GA is engaged is currently white.  This is incorrect.  The colour should be green.

  • At 100 feet AGL, if IAN is engaged and the autopilot remains selected, a flashing AUTOPILOT warning in amber colour will be displayed on the PFD.   This is correct.  However, an audible ‘autopilot’ callout should also be heard.  This is not simulated.

Important Point:

  • ProSim737 users should also note, that for IAN to function within the avionics suite, it must be selected in the cockpit set-up page of the Instructor Station (IOS).

Note 1:   IAN works flawlessly for straight-in approaches (or approaches that are slightly offset).  However, the ProSim software when using some RNAV (RNP) approaches has trouble maintaining the correct vertical profile.

When a RNAV (RNP) approach (not AR) is selected, IAN arms and engages very late in the approach profile (after the FAF).  The altitude that IAN engages is well below the profile used in VNAV; this results in the aircraft diving to capture the IAN glide path.  Once the aircraft is established on the glide path IAN works as it is supposed to. 

The above scenario does not occur with every VNAV (RNP) approach; only those that exhibit a curved radius to fix (RF) profile or short leg profile to the runway threshold.

In the real aircraft (depending on operator and country of operation) IAN can handle all RNAV (RNP) approaches with the exception of RNAV (RNP-AR)  approaches.

In comparison, Precision Manuals Development Team (PMDG) NGX and NGXu can fly the above approaches in IAN.  This has been achieved by artificially replicating the approach using various hidden ‘waypoints’ that their software can read.  In effect, what you are seeing is the aircraft flying over the waypoints that have been overlaid onto the curves in the approach. 

I do not believe ProSim has replicated PMDG’s methodology in their software.

Therefore, if flying an RNAV (RNP) approach using IAN, select only those approaches that are ‘more or less’ straight-in without RF curves or turns; otherwise, use LNAV/VNAV.

BELOW:   Montage of four screen captures of the PFD showing some of the displays generated during an IAN approach (images upper left to right then bottom left to right).  Images 1-3 are sequential. Image 4 is standalone.

Image 1:  Aircraft is LNAV/VNAV approaching the IAF.  The aircraft is too far from the runway for IAN to be in range to operate (RJAA VOR Rwy 16R).

Image 2:  Aircraft is in range of RJAA localiser (tuned in the navigation radio).  Runway data is displayed from localiser and Deviation Pointers are displayed in outlined white-coloured diamonds (anticipation pointers).  The Deviation Pointers will change from white (outline) to magenta (either outline or solid) when either the localiser or glide path is captured.  FAC and G/P are displayed on the FMA in white indicating that IAN has been armed.  Note that if IAN was not armed, only the runway data and Deviation Pointers would be displayed (RJAA VOR Rwy 16R).

Image 3:  IAN has captured the localiser and the lateral Deviation Pointer is displayed as a solid magenta-coloured diamond.  FAC (in green) is displayed on the FMA.  The vertical Deviation Pointer is still in outline and in white (anticipation pointer), as is the G/P on the FMA.   IAN is tracking the localiser (RJAA VOR Rwy 16R).

Image 4:  IAN has engaged.  The runway data is now sourced from the FMC and not the localiser (as in the above examples).  The FMA displays FAC and G/P in green colour, SINGLE CH is displayed, and both Deviation Pointers are solid magenta-coloured diamonds.  IAN has captured the Glide Path (RJAA ILS X or LOC X Rwy 16L).

Montage of four screen captures of the PFD showing some of the displays generated during an IAN approach (images upper left to right then bottom left to right).  Images 1-3 are sequential. image 4 is standalone

Image 1: Aircraft is LNAV/VNAV approaching the IAF.  The aircraft is too far from the runway for IAN to be in range to operate (RJAA VOR Rwy 16R).

Image 2: Aircraft is in range of RJAA localiser (tuned in the navigation radio).  Runway data is displayed from localiser and Deviation Pointers are displayed in outlined white-coloured diamonds (anticipation pointers).  The Deviation Pointers will change from white (outline) to magenta (either outline or solid) when either the localiser or glide path is captured.  FAC and G/P are displayed on the FMA in white indicating that IAN has been armed.  Note that if IAN was not armed, only the runway data and Deviation Pointers would be displayed (RJAA VOR Rwy 16R).

Image 3: IAN has captured the localiser and the lateral Deviation Pointer is displayed as a solid magenta-coloured diamond.  FAC (in green) is displayed on the FMA.  The vertical Deviation Pointer is still in outline and in white (anticipation pointer), as is the G/P on the FMA.   IAN is tracking the localiser (RJAA VOR Rwy 16R).

Image 4: IAN has engaged.  The runway data is now sourced from the FMC and not the localiser (as in the above examples).  The FMA displays FAC and G/P in green colour, SINGLE CH is displayed, and both Deviation Pointers are solid magenta-coloured diamonds.  IAN has captured the Glide Path (RJAA ILS X or LOC X Rwy 16L)

Videos of IAN Approach


IAN APPROACH IN SIMULATOR


IAN APPROACH IN REAL 737-800 AIRCRAFT


Final Call

The use of Global Positioning Systems has enabled stabilised approaches at many airports, and the IAN system can take advantage of this technology to provide intuitive displays that support stabilised approaches on a consistent basis. 

Aircraft fitted with IAN are capable of using the APP button located on the MCP to execute an instrument ILS-style approach based on flight path guidance from the FMC.  This makes Non Precision Approaches easier to execute with increased safety.  It also enables a constant descent angle, less engine spooling, wear and tear, and improved passenger comfort.  Furthermore, IAN uses a standardised and consistent procedure, that in addition to improved displays and alerts,  can be used in place of LNAV/VNAV.

Nevertheless, a flight crew must be vigilant when using any automation, especially during the critical approach phase where there is little margin for error.  First and foremost is the innate ability to fly the airliner manually, and although automation such as IAN can enhance safety, it does so at the detriment of manual flying skills.

References

Several sources were used to obtain the information documented in this post, including: personal communication with a B737-800 pilot, the Boeing Flight Crew Training Manual and the Boeing 737 Technical Guide by Chris Brady.

If any discrepancies are noted in this article, please contact me so they can be rectified.

Acronyms and Glossary

  • AGL – Above Ground Level

  • APP – Approach button located on MCP

  • CDU – Control display Unit (glorified keyboard)

  • EFIS – Electronic Flight Instrument Display

  • FAC – Final Approach Course

  • FAF – Final Approach Fix

  • FMA – Flight Mode Annunciator

  • FMC – Flight Mode Computer

  • FMS – Flight Management System

  • G/P – Glide Path (Non Precision Approach / NPA)

  • G/S – Glideslope (Precision Approach / PA)

  • IAF – Initial Approach Fix

  • IAN – Integrated Approach Navigation

  • ILS – Instrument Landing System

  • IMC – Instrument Meteorological Conditions

  • MAP – Missed Approach Point

  • MCP – Mode Control Panel

  • MDA - Minimum Descent Altitude

  • ND – Navigation Display

  • PFD – Primary Flight Display

  • RA – Radio Altitude

  • RF – Radius to fix

  • RNAV (RNP-AR) Approach - RNP-AR is a subset of an RNAV approach that requites authorization (RA) to fly

  • Select – To select , arm or engage something

  • STAR  -  Standard Terminal Arrival Route

Review and Updates

  • 25 August 2017 - Review and content updated.

  • 03 December 2019 - Review and content updated.

  • 29 October 2019 - Review and content updated.

  • 28 April 2021 - Review and content updated.  Release of .pdf.

  • 21 December 2022 - Updated to latest procedure changes.