
How To Calibrate Flight Controls in Flight Simulator Using FSX, Prepar3D or FSUIPC
/Imagine for a brief moment that you are driving an automobile with a wheel alignment problem; the vehicle will want to travel in the direction of the misalignment causing undue stress on the steering components, excessive tyre wear, and frustration to the driver.
Similarly, if the main flight controls are not accurately calibrated; roll and pitch will not be correctly simulated causing flight directional problems, frustration and loss of enjoyment.
Flight controls are usually assigned and calibrated in a two-step process, first in Windows, then either by using the internal calibration provided in the FSX, Prepar3D, ProSim737, or using the functionality provided by FSUIPC.
It's often easier to think of calibrating controls as a two-stage process - Primary Calibration (in Windows) and Secondary Calibration (in Prosim737, flight simulator, or FSUIPC).
In this post, the method used to assign and calibrate the main flight controls (ailerons, elevators and rudder pedals) in FSX, Prepar3D and FSUIPC will be discussed. Internal calibration in ProSim737 will not be discussed. The common theme will be the calibration of the ailerons, although these methods can calibrate other controls. The calibration of the throttle unit will not be discussed.
Many readers have their controls tweaked to the tenth degree and are pleased with the results, however, there are 'newcomers' that lack this knowledge. I hope this post will guide them in the 'right direction'.
STEP 1 - Calibrating and Registering Control Devices in Windows (Primary Calibration)
All flight controls use a joystick controller card or drivers to connect to the computer. This card must be registered and correctly set-up within the Windows operating system before calibration can commence.
Type ‘joy’ into the search bar of the computer to open the ‘game controllers set-up menu’ (set-up USB game controllers). This menu will indicate the joystick controller cards that are attached to the computer (Figure 1).
Scroll through the list of cards and select the correct card for the flight control device. Another menu screen will open when the appropriate card is selected. In this menu, you can visually observe the movements of the yoke, rudder pedals and any yoke buttons that are available for assignment and use. The movement of the controls will be converted to either a X, Y or Z axis (Figure 1).
Follow the on-screen instructions, which usually request that you move the yoke in a circular motion, stopping at various intervals to depress any available button on the device. The same process is completed for the movement of the control column (forward and aft) and the rudder pedals (left and right). Once completed, click ‘save’ and the profile will be saved as an .ini file in Windows.
FIGURE 1: Windows Joystick Calibration User Interface or Game Controller Interface in (Primary Calibration of joystick controllers)
Registration is a relatively straightforward process, and once completed does not have to be repeated, unless you either change or reinstall the operating system, or recover from a major computer crash, which may have corrupted or deleted the joystick controller’s .ini file.
STEP 2 - Assigning Flight Control Functionality in FSX and Prepar3D (Secondary Calibration)
Open FSX or Prepar3D and select from the menu ‘Options/Settings/Controls’. The calibration, button key and control axis tab will open (Figure 2).
Select the ‘Control Axis’ tab. When the tab opens, two display boxes are shown. The upper box displays the joystick controller cards connected to the computer while the larger lower box displays the various functions that can be assigned. The functions that need to be assigned are ailerons, elevators and rudders.
Select/highlight the appropriate entry (i.e. ailerons) from the list and click the ‘Change Assignment’ tab. This will open the ‘change assignment’ tab (Figure 3). Physically move the yoke left and right to its furthest extent of travel and the correct axis will be assigned. To save the setting, click the ‘OK’ button.
When you re-open the ‘Control Axis’ tab you will observe that the function now has an axis assigned and this axis is identical to the axis assigned by Windows when the device was registered. You will also note a small box labelled ‘Reverse’. This box should be checked (ticked) if and when the movement of the controls is opposite to what is desired (Figure 3).
Save the set-up by clicking the ‘OK’ button.
FIGURE 2: FSX Settings and Controls Tab (Prepar3D menus are similar)
FIGURE 3: FSX Change Assignment Menu
STEP 3 - Calibrating Flight Controls in FSX and Prepar3D
The flight control functions that have been assigned must now be calibrated to ensure accurate movement.
First, select and open the ‘Calibration’ tab. Ensure the box labelled Enable Controllers(s)’ is checked (ticked) (Figure 4).
The correct joystick controller card must be selected from the list displayed in the box beside the controller type label.
Whether simple or advanced controls are selected is a personal preference. If advanced controls are selected, the various axis assignments will be shown in the display box. The axis, sensitivity and null zone can be easily adjusted using the mouse for each of the flight controls (ailerons, elevators and rudders).
Concerning the sensitivity and null zone settings. Greater sensitivity causes the controls to respond more aggressively with minimal physical movement, while lesser sensitivity requires more movement to illicit a response. It is best to experiment and select the setting that meets your requirement.
The null zone creates an area of zero movement around the centre of the axis. This means that if you create, for example, a small null zone on the ailerons function, then you can move the yoke left and right for a short distance without any movement being registered.
Creating a null zone can be a good idea if, when the flight controls are released, their ability to self-center is not the best. Again, it is best to experiment with the setting. To save the settings click the ‘OK’ button.
FIGURE 4: FSX Settings and Controls
This completes the essential requirements to calibrate the flight controls; however, calibration directly within FSX or Prepar3D is rather rudimentary, and if greater finesse/detail is required then it's recommended to use FSUIPC.
FSUIPC
FSUIPC pronounced 'FUKPIC' is an acronym for Flight Simulator Universal Inter-Process Communication, a fancy term for a software interface that allows communication to be made within flight simulator. The program, developed by Peter Dowson, is quite complex and can be downloaded from the website. FSUIPC allows many things to be accomplished in flight simulator; however, this discussion of FSUIPC, will relate only to the assigning and calibrating of the flight controls.
It's VERY important that if FSUIPC is used, the FSX or Prepar3D ‘Enable Controllers’ box must be unchecked (not ticked) and the joystick axis assignments, that are to be calibrated in FSX or Prepar3D be deleted. Deleting the assignments in optional, however, recommended. The flight controls will only function accurately with calibration from one source (FSX, Prepar3D or FSUIPC)
STEP 1 - Assigning Flight Controls Using FSUPIC
Open FSX or Prepar3D and from the upper menu on the main screen select Add Ons/FSUIPC’. This will open the FSUIPC options and settings interface (Figure 5).
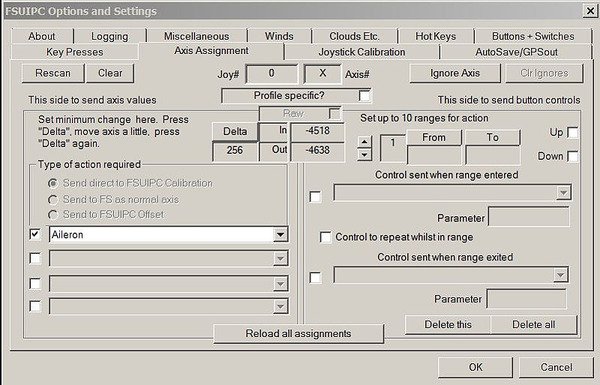
Navigate to the ‘Axis Assignment’ tab to open the menu to assign the flight controls to FSUIPC for direct calibration (Figure 6).
Move the flight controls to the full extent of their movement. For example, turn the yoke left and right or push/pull the control column forward and aft to the end of their travel. You will observe that FSUIPC registers the movement and shows this movement by a series of numbers that increase and decrease as you move the flight controls. It will also allocate an axis letter.
At the left side of the menu (Figure 6) is a label ‘Type of Action Required’; ensure ‘Send Direct to FSUIPC Calibration’ is checked (ticked). Open the display menu box directly beneath this and select/highlight the flight control functionality (ailerons, elevator or rudder pedals). Check (tick) the box beside the function.
FIGURE 5: FSUPIC Main Menu
FIGURE 6: FSUIPC Axis Assignments
Calibrating Flight Controls Using FSUIPC
Select the Joystick Calibration’ tab. This will open an 11 page menu in which you calibrate the flight controls in addition to other controls, such as multi-engine throttles, steering tiller, etc. Select page 1/11 'main flight controls' (Figure 7)
Open the ‘Aileron, Elevator and Rudder Pedals’ tab (1 of 11 main flight controls). Note beside the function name there are three boxes labelled ‘set’ that correspond to min, centre and max. There is also a box labelled ‘rev’ (reverse) which can be checked (ticked) to reverse the directional movement of the axis should this be necessary. The tab labelled ‘reset’ located immediately below the function name opens the calibration tool. The ‘profile specific’ box is checked (ticked) when you want the calibration to only be for a specific aircraft; otherwise, the calibration will be for all aircraft (global). The box labelled filter is used to remove spurious inputs if they are noted and for the most part should be left unchecked (not ticked). The tab labelled ‘slope’ will be discussed shortly.
Click the ‘reset’ tab for the ailerons and open the calibration tool. Move the yoke to the left hand down position to its furthest point of travel and click ‘set’ beneath max. Release the yoke and allow it to center. Next, move the yoke to the right hand down position to its furthest point of travel and click ‘set’ beneath min. Release the yoke and allow it to center. If a null zone is not required, click the ‘set’ beneath centre.
If a problem occurs during the calibration, the software will beep indicating the need to restart the calibration process. The basic calibration of the yoke is now complete. However, to achieve greater accuracy and finesse it is recommended to use null zones and slope functionality.
FIGURE 7: FSUIPC Joystick Calibration (ailerons, elevator and rudder)
Null Zones
The null zone concept has been discussed earlier in this article.
If a null zone is required either side of the yoke center position, move the yoke to the left a short distance (1 cm works well) and click ‘set’ beneath centre. Next, move the yoke 1 cm to the right and click ‘set’ beneath centre.
As you move the yoke you will observe in the side box a series of numbers that increase and decrease; these numbers represent the movement of the potentiometer. It is not important to understand the meaning of the numbers, or to match them.
Replicate the same procedure to calibrate the elevators and rudder pedals (and any other controller devices)
To save the setting to the FSUIPC.ini file click ‘OK’.
It is a good idea to save the FSUIPC.ini file as if a problem occurs at a later date, the calibration file can easily be resurrected. The FSUIPC.ini file is located in the modules folder that resides in the FSX or Prepar3D route folder.
Slope Functionality
Slope functionality is identical to the sensitivity setting in FSX and Prepar3D. Decreasing the slope (negative number) causes the controls to be more sensitive when moved, while a positive number reduces the sensitivity. To open the slope calibration, click the ‘slope’ tab. This will open a display box with an angled line. Manipulating the shape of this line will increase or decrease the sensitivity.
Slope functionality, like the null zone requires some experimentation to determine what setting is best. Different flight controls have differing manufacturing variables, and manipulating the slope and null zone allows each unit to be finely tuned to specific user preferences.
Does FSUIPC make a Difference to the Accuracy of the Calibration ?
In a nutshell – yes. Whilst the direct assignment and calibration in FSX and Prepar3D is good, it's only rudimentary. FSUIPC enables the flight controls to be more finely adjusted equating to a more stable and predictable response to how the controls react.
Potential Problems
If using FSUIPC for axis assignment and calibration, remember to uncheck (not tick) the ‘enable controller’ box and delete the axis assignments in FSX or Prepar3D – only one program can calibrate and control the flight controls at any one time. If calibration from both FSX or Prerpar3D and FSUIPC are used at the same time, spurious results will occur when the flight controls are used.
If the calibration accuracy of the flight controls is in doubt (spurious results), it is possible that the simulator software has inadvertently reassigned the axis assignments and enabled calibration.
There's an intermittent issue in FSX and Prepar3D where the software occasionally enables the controllers and reassigns the axis assignment, despite these settings having been unchecked (not enabled). If a problem presents itself, it's best to double check that this has not occurred. This is why I recommend that the settings be deleted, rather than just being unchecked.
Final Call
Many enthusiasts are quick to blame the hardware, avionics suite, or aircraft package, when they find difficulty in being able to control the flight dynamics of their chosen aircraft. More often than not, the problem has nothing to do with the software or hardware used, but more to do with the calibration of the hardware device.
The above steps demonstrate the basics of how to calibrate the flight controls - in particular the ailerons. If care is taken and you are precise when it comes to fine-tuning the calibration, you maybe surprised that you are now able to control that 'unwanted pitch' during final approach.
Further Information and Reading
Documents relating to FSUIPC can be found in the modules folder in your root director of flight simulator on your computer. The below link addresses how to calibrate the steering tiller.
Updated 06 July 2020.


